Summer Vegetable Soup

Every week I try to make a healthy lunch that will last me for the week. I love not having to put something together every single night… and I feel much better about taking something homemade rather than store-bought (although sometimes in a pinch that stuff is awesome!). Soups make a great lunch. Usually they taste even better after sitting for a couple of days as it allows the flavors to meld together. This vegetable soup is a delicious, healthy, and very customizable recipe that made for an awesome lunch. You can use pretty much any vegetable you have on hand, mix and match depending on your own personal preferences, use up frozen vegetables from the freezer, and little bits of leftover pasta. This was a great recipe to use in my quest to clean out my fridge/freezer/pantry. I had an open bag of frozen peas that I threw into this, a bit of Israeli couscous, some red potatoes that were on their last hurrah, a can of cannellini beans that has been in my pantry forever, and all I had to buy was some zucchini, vegetable stock and green beans. You can throw in some diced sweet potatoes, fresh tomatoes instead of canned, yellow squash, spinach, leeks instead of onions… the sky’s the limit.

Summer Vegetable Soup

Summer Vegetable Soup

Serves 6

Ingredients:

1 Tbsp olive oil

1 small onion, quartered and sliced thin

6 cups low-sodium vegetable broth (or more, if desired to make the soup broth-ier)

1-2 small zucchinis, halved lengthwise and sliced into 1/4-inch pieces

1 (15-oz) can cannellini beans (or Navy beans)

5 small red potatoes, diced

1 cup peas (fresh or frozen)

1 cup corn (fresh or frozen)- I omitted this because I didn’t have any

1 cup green beans (fresh or frozen), cut into 1-inch pieces

1 (14-oz) can diced tomatoes, with juice

1/2 tsp ground black pepper

3/4 tsp Kosher salt

1/8 tsp tumeric

2-4 ounces Israeli couscous (or other small pasta shape), optional

2 Tbsp tomato paste

Directions:

1. Place a large pot or Dutch oven over medium heat. Add onions and saute for 3-4 minutes, until softened.

2. Add the vegetable broth, zucchini, beans, potatoes, peas, corn, green beans, diced tomatoes and juice, salt, pepper, and tumeric. Bring to a boil, and then lower heat to a simmer, cover, and simmer for 25-30 minutes, until the vegetables are tender. If you are using pasta, add when there is about 10-15 minutes left of cooking time.

3. Remove from the heat, and stir in the tomato paste. Season to taste with salt and pepper.

Source: barely adapted from Prevention RD (originally adapted from food.com)

Pan-Seared Cod with Mushrooms

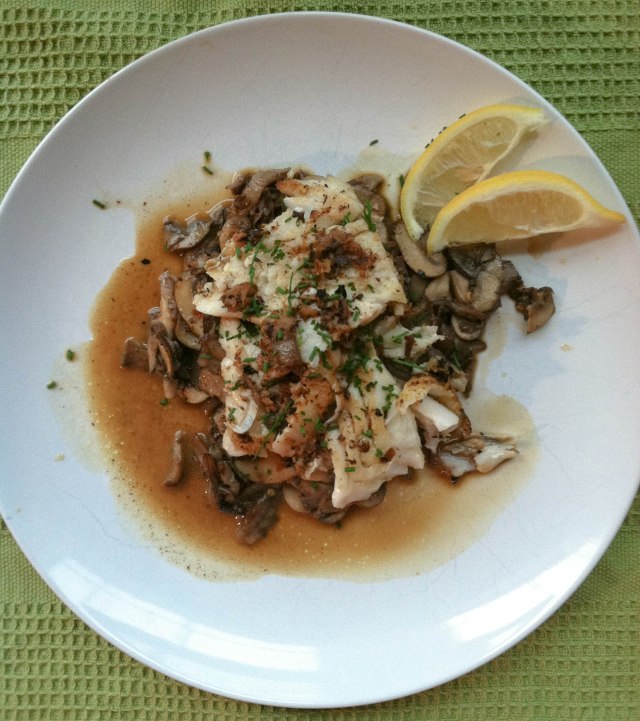
Happy happy Friday everyone! I am so glad it’s the weekend, and this weekend is super-special because it if my boyfriend Ron’s birthday! He is turning the big 3-1.  Now he can officially say he’s in his 30’s. He doesn’t care at all- it seems to me that guys just don’t care as much about their age as women do. We are going to have a low-key birthday, as he’s not a big party person. I told him that I would cook him whatever he wanted, and so far the menu that he has chosen includes wings, quesadillas and pizza! I fully expect to gain about 50 pounds this weekend 🙂 This dinner was the opposite of pizza and wings! Although it is somewhat rich due to the butter and olive oil, the fish and mushrooms are so good for you that I think it evens out. I loved the combination of the buttery-lemony sauce with the mild flaky cod and earthy mushrooms! Mushrooms are one of my favorite foods, so that combined with the seafood made this dish a winner in my book… and even though I didn’t have the proper spatula to flip my fish and it ended up breaking up a but, I still think this dish was really pretty and impressive looking… and it only used one skillet, and you all know how I feel about that!

Pan-Seared Cod with Mushrooms

Pan-Seared Cod with Mushrooms

Serves 2

Ingredients:

3 Tbsp olive oil

1 lb mushrooms (I used a combination of shiitake, oyster and cremini)

Kosher salt and freshly ground black pepper

Pinch of dried red chile flakes

2 skinless fillets of cod, about 1 lb (You can substitute other firm white fish such as snapper or hake)

1 cup low-sodium vegetable broth

2 Tbsp cold butter

2 Tbsp freshly squeezed lemon juice (from about 1 lemon)

Fresh cilantro, parsley or chives (for garnish)

Lemon wedges, for serving (optional)

Directions:

1. Place a large (12-inch) skillet over medium-high heat, and add 2 Tbsp olive oil. Add the mushrooms, salt, peppers, and a pinch of red chili flakes, and cook until the liquid is evaporated and the mushrooms are browned, about 5-8 minutes, stirring occasionally. Remove the mushrooms to a warmed serving dish.

2. Season fish with salt and pepper. Wipe down the skillet, and add remaining oil. Place again over medium-high heat. When oil is shimmering add the fish. Cook about 3 minutes on first side without moving. Flip carefully, and cook until fish is done, about 2 more minutes. Remove to the serving dish with the mushrooms.

3. Place the skillet back on the heat, increasing the heat to high. Add the vegetable broth and cook about 2 minutes, until it is reduced by half. Remove from the heat, and stir in the butter and lemon juice. Season to taste with salt and pepper. Pour the sauce over the fish and mushrooms. Garnish with cilantro, parsley or chives if desired, and serve with lemon wedges if you’d like.

Source: Serious Eats

Brown Rice and Beans with Chile-Ginger Salsa

I hope everyone is having a good week! I am so excited that tomorrow is Friday. The week has just been so busy and everyone has been sick at work, so I need to get some fresh air away from all the germs! I plan on sleeping in this weekend (if getting up at 8 can be considered sleeping in), doing some spring cleaning, planting some flowers, watching some movies, and just relaxing. I love weekends where I have no formal plans. Maybe that’s boring for some people, but it’s just the way I like my weekends to be!

When I saw this recipe in the April issue of Bon Appetit I knew immediately that it was something I wanted to make. Sure, it’s super simple, pretty much just a rice and bean bowl, but the chile-ginger salsa was what really intrigued me. Ginger is not something you usually see in salsas, and since I loved all the flavors that were to make up the salsa, I knew it would be something delicious! Plus, I have no problem with a simple meal of rice and beans. In fact, that’s one of my go-to meals when I’m alone for dinner, and don’t know what to make- rice, beans, a fried egg, and some hot sauce. Simple, filling and satisfying. This meal dresses up the basics with sauteing some onion before you add the rice to the pot, and then adding some cilantro at the end. The beans are also jazzed up with onion, cumin and coriander, and then you have that chile-ginger salsa to put on top, along with a bunch of toppings of your choosing. Of course, I used them all! I made this meal to bring to lunch for the week, and I never got bored of it. It was a super satisfying vegetarian meal, and you could totally make it vegan just by omitting the cheese. Now that I’m thinking about ginger in the salsa, this reminds me of another awesome meal that I haven’t made in forever from the New York TimesIts a gently cooked chicken with a garlic-chile-ginger sauce. I will have to make that soon!

Brown Rice and Beans with Chile-Ginger Salsa

Serves 4

Ingredients:

2 Tbsp olive oil, divided

1 medium onion, chopped, divided

1 cup brown rice

Kosher salt

1/2 cup fresh cilantro, coarsely chopped, divided

Freshly ground black pepper

1 tsp ground coriander

1 tsp ground cumin

2 (15-oz) can black beans, drained and rinsed

1 cup low-sodium vegetable broth or water

2 red jalapenos (or Fresno or Holland chiles), stemmed, halved and seeded

1 garlic clove

1 Tbsp ginger, chopped and peeled

1 Tbsp finely grated lime zest

1/4 cup fresh lime juice

1 avocado, halved, pitted and chopped

1/4 cup Cojita or feta cheese, crumbled

Lime wedges

Directions:

1. Place a medium saucepan over medium heat, and add 1 Tbsp of the olive oil. Add 1/4 of the chopped onion, and saute about 5 minutes, until softened. Add the rice, and stir to coat. Add 2 cups water, season with salt, and bring to a boil. Once boiling, lower heat to low, cover and cook for 40-50 minutes, until rice is cooked. Then remove from the heat, let stand, covered for 10 minutes. Remove cover, fluff with fork, add 1/4 cup of the cilantro, and season with salt and pepper to taste.

2. In the meantime, add the remaining Tbsp of oil to a medium saucepan, and place over medium heat. Add 2/3 of the remaining onion, and saute for about 5 minutes until the onion is softened. Add the coriander and cumin, and cook, stirring, for a minute. Add the black beans and broth or water, season with salt and pepper and bring to a boil. Reduce the heat to low and simmer for about 8-10 minutes, until slightly thickened, mashing slightly.

3. To make the chile-ginger salsa, add the chiles, garlic, lime zest, lime juice and remaining onion to a blender or a mini-food processor. Pulse a few times, until it forms a chunky salsa. Season with salt to taste.

4. To serve, add the rice and the beans to a bowl, top with salsa, avocado, cheese, cilantro, and lime wedges.

Source: Bon Appetit, April 2013

Mushroom and Shrimp Noodle Bowls

I subscribe to a lot of food magazines- Cook’s Illustrated, Bon Appetit and Every Day with Rachel Ray among others. While I find some of the things in Rachel Ray’s magazine a little hokey (such as the nicknames for certain foods), and there are months where I’m not really compelled to make any recipes, there are other times where I get one of her magazines and I want to make everything, and this is what keeps me a subscriber. That, and I’ve yet to make a recipe of hers and not like it. This past issue (the April issue) was one of the later. There were so many recipes I wanted to try, and up first were these mushroom and shrimp noodle bowls. Making this recipe also gave me an excuse to buy five-spice powder, an ingredient that I’ve never cooked with before. I loved the complexity it gave this dish, and while it still would have been tasty without it, it gave it a little extra something that added more interest to these noodle bowls. There are many variants of five-spice powder, so depending on the mixture you buy it could contain star anise, cloves, cinnamon, Sichuan pepper, fennel (these five are common ingredients), anise, ginger, nutmeg, tumeric, black pepper, orange peel or galangal. Therefore, your noodle bowls may have variation in flavor depending on the brand of five-spice powder. I bought a blend at Whole Foods (the only blend I could find), and theirs contained orange peel, tamari powder, lemon peel and organic spices (which spices are not specified). Regardless of what may or may not have been in the mix, I loved the flavors in this dish.

Mushroom and Shrimp Noodle Bowls

Mushroom and Shrimp Noodle Bowls

Serves 4

Ingredients:

Salt and pepper

1 lb spaghetti (regular or whole wheat)

3 Tbsp vegetable oil

3/4 mixed mushrooms (i.e. shiitake, cremini, hen-of-the-woods or maitake)

1/4 head savoy or napa cabbage, thinly sliced

1 bunch scallions, thinly sliced on the diagonal

1 small red chile pepper, thinly sliced

3-4 cloves garlic, chopped

1 (1-inch) piece fresh ginger, grated

1 lb medium shrimp, shelled and deveined

1 tsp Chinese five-spice powder

2 cups vegetable or chicken stock

1/4 cup tamari, soy sauce, or liquid amino

Directions:

1. Bring a large pot of salted water to a boil, and cook spaghetti until al dente.

2. While the spaghetti is cooking, heat the oil in a large (12-inch) skillet over high heat. Add the mushrooms and stir-fry 3-4 minutes until any liquid evaporated, and they become browned. Add the cabbage, scallions, chile pepper, garlic and ginger. Season with pepper. Stir-fry, stirring constantly, for 2-3 minutes.

3. Add the shrimp and the five-spice powder. Stir-fry, stirring constantly, for about 2 minutes until the shrimp turn pink. Add the chicken or vegetable stock and the tamari or soy sauce, lower the heat to medium, and continue to cook until the shrimp are cooked through.

4. Serve the mushroom and shrimp mixture over the pasta. Either mix together, or place the pasta in bowls and ladle the shrimp-mushroom mixture over the top.

Source: Every Day with Rachel Ray, April 2013


Red Lentil and Sweet Potato Stew

I wanted to share with you one more of my favorite meals from week 1 of the Whole Living 2013 Action Plan. This red lentil and sweet potato stew is so flavorful and exciting it is hard to believe that it is incredibly healthy for you. Full of fragrant spices, sweet peppers and sweet potatoes, and those wonderful red lentils, this is something I see myself making time and time again. It was one of my favorite meals of the whole cleanse. Speaking of- I completed it this past Saturday! It was a wonderful experience and something I could see myself doing once a year! That said, I did indulge in pretty much everything that was off-limits on Sunday. I probably should have eased back in to eating gluten, dairy, meat, sugar, and coffee, but I couldn’t help myself!  I needed that large coffee, bacon, egg and cheese sandwich, and those chocolate stout cupcakes! I do plan on keeping up with the healthy eating most of the time however, with only occasional splurge meals.

I’ll definitely be sharing a few more of my favorite meals from the Action Plan, so stay tuned!  And then, once I update you on those healthy recipes I want to share with you the recipe for the chocolate stout cupcakes I made for St. Patrick’s Day (aka the BEST chocolate cupcakes in the world), and also a recipe for an awesome Buffalo Chicken Salad.

One more thing I wanted to share- my best friend (who I did this cleanse with, and whose Maid of Honor I’ll be in her November wedding) just started her own blog, Living Life Brightly, and would love for you to check it out! She has a great write-up on her experience with the Whole Living Action Plan over there!


Red Lentil and Sweet Potato Stew
Serves 4

Ingredients:
2 Tbsp coconut or extra-virgin olive oil
1 tsp ground cumin
1 tsp ground turmeric
1 Tbsp curry powder
1 large onion, diced
Coarse salt and freshly ground black pepper
4 cloves garlic, minced
2 Tbsp fresh ginger, minced
2 sweet potatoes, peeled and diced
1 red bell pepper, diced
1 1/2 cups red lentils, rinsed
6 cups cleansing broth or vegetable broth
Fresh cilantro, chopped

Directions:
1. Over medium heat, heat oil in a large pot. Add cumin, turmeric and curry powder and cook about 1-2 minutes, until fragrant. Add onion and a few pinches of salt, and cook about 6 minutes until tender, stirring frequently. Add garlic and ginger and cook about 2 minutes, until tender, stirring frequently. Add sweet potatoes and red bell peppers, and cook for a minute.
2. Add lentils and broth, and bring to a boil. Reduce heat and simmer 20-25 minutes until lentils are tender.Season to taste with salt and pepper. Garnish with cilantro.

Source: Whole Living Magazine, January/February 2013

Cauliflower "Rice" Stir-Fry

Wow! I really didn’t mean to go so long without posting! Time is speeding by, and I just can’t keep up with it. How is it already March?!  Soon buds will be sprouting on the trees, flowers will be blooming, I’ll be able to open the windows in my apartment, and I’ll be able to go outside without a coat. It’s insane how time is speeding by.

Anyway…. As I mentioned in one of my last posts, my best friend and I decided to do the Whole Living Cleanse as a healthy living challenge and we are currently about 2/3 into it! It’s been hard at times (the beginning especially), but really good! I’m definitely feeling healthier and have even dropped a few pounds! The cleanse has you omit certain things from your diet- dairy, gluten, meat, processed foods, added sugar, alcohol and coffee. The things I’m struggling the most with are not drinking coffee, and my cravings for salty things and carbs. I really haven’t been craving sugar at all, and I’m doing fine without the meat and dairy. This cleanse has made me realize just how much mindless snacking I do in my everyday life- I realize that I just reach for a handful of this here, and a handful of that there and it really adds up, so I think this cleanse has been great as it has made me be mindful of what enters my body. I can definitely see myself keeping up with this way of eating in some capacity when it is finished. Limiting my intake of processed foods and added sugars especially. I will definitely be getting a cup of coffee as soon as this is done however- I think the research on the benefits of coffee supports me on that too 🙂

So doing this cleanse has definitely been not quite as hard as it could be due to the mostly delicious recipes it has encompassed. I wanted to share some of my favorites here, but go to the website for the remainder!!  My favorite of the first week was this cauliflower “rice” stir-fry. I loved using the cauliflower as a rice substiiute! I’ve seen this done, but have never tried it myself. Of course it doesn’t taste quite like rice, but it is super delicious and if you looking at lowering your carb intake, this is a great way to do it.

Cauliflower “Rice” Stir-Fry
Serves 2

Ingredients:
2 cups cauliflower florets
2 Tbsp coconut or extra-virgin olive oil, divided
1 sliced red onion, divided
4 cloves garlic, minced, divided
Coarse salt
1/4 cup cleansing broth, or vegetable broth
1 Tbsp fresh ginger, minced
1 small red chile, thinly sliced
2 cups broccoli florets
1 large carrot, julienned
1/2 red bell pepper, stemmed, seeded, and diced
Juice of 1/2 lemon
2 Tbsp shelled pumpkin seeds
2 Tbsp fresh cilantro leaves

Directions:
1. In a food processor pulse cauliflower florets until finely chopped.
2. In a large skillet, heat one Tbsp of oil over medium heat. Add half of the onion and half of the garlic, and cook about 6 minutes, until tender, stirring frequently. Add cauliflower. Season with salt. Add broth, and place cover on pan. Steam about 6 minutes until the cauliflower is tender, and the broth has evaporated. Remove to a bowl and cover to keep warm.
3. Wipe out pan, and add remaining oil. Increase the heat to medium-high. Add remaining onion, and cook about 5 minutes until tender. Add remaining garlic, ginger, and chile, and cook for 1 minute. Add the broccoli, carrot and red pepper, and cook about 5 minutes, until tender, stirring occasionally. Season to taste with salt.
4. Remove from heat and add lemon juice.
5. When serving, sprinkle pumpkin seeds and cilantro on top of the stir-fry.

Source: Whole Living, January/February 2013

Quinoa-Stuffed Pattypan Squash

What’s up guys?!?! It’s good to be back! I’ve been on a super-long hiatus, but hopefully I’ll be posting here much more frequently and regularly from now on. I miss my little blog! I’ve been lacking motivation to blog for a looooooong time….I’ve been cooking more than ever, but when it comes time to take photos, write a post, edit it and publish, I’ve been majorly slacking….. But I really want that to change for myself and my readers!! So for my mid-summer resolution, I’ve decided to try and get back to this whole blogging thingamajig!


In the past 6 months or so I’ve really been trying to eat healthier, and be more conscious about what enters my body- it is a temple and all that ya know! So expect to see more healthy recipes on here. Now, that certainly doesn’t mean I don’t indulge in the occasional treat, for example the totally delicious and non-waistline friendly peanut butter pie I made and ate last night for my boyfriend’s (30th!!!!) birthday, so expect to still see treats and whatnot as well. 


For my return, I am posting this delicious (and healthy) stuffed squash recipe that I made tonight for dinner. I found these cute Pattypan squash at Whole Foods this weekend and just couldn’t resist! They were a really good price ($2.99/lb) especially for being local and organic! Hopefully I’ll be able to find more soon since they were so yummy, and I’d love to make this recipe again and try out some others!  I’ve never cooked Pattypan squash before and so I searched around for a yummy sounding recipe, and stumbled upon one on one of the blogs I regularly read- Oh She Glows– which is a wonderful vegan blog.  I, as you know, am not vegan, but I do try to eat mostly meatless throughout the day, saving meat for dinner, and also sometimes omitting the meat from dinner as well- if my boyfriend is not home- he’s definitely the more carnivorous one in out relationship 🙂 


I did not have all the ingredients needed for that particular recipe, but I used it as inspiration and adapted it to the ingredients in my own pantry/refrigerator.  I’d love to make the original recipe at some point as well, so check that one out too!  It looks awesome!


Quinoa-Stuffed Pattypan Squash
Serves 1


Ingredients:
3 pattypan squash
1/4 cup quinoa
1/2 cup low-sodium chicken broth (or vegetable broth if you want this to be completely vegetarian)
1-2 small garlic cloves, smashed
1 small zucchini
1 green onion
1 Tbsp tomato paste
1/2 Tbsp unsalted butter
Salt and freshly ground black pepper, to taste

Directions:
1. Preheat your oven to 375 degrees.
2. Bring quinoa, broth, and smashed garlic cloves to a boil over high heat in a small saucepan.  Once it starts to boil, reduce heat to low, and cover.  Cook for 20 minutes.
3. While quinoa is cooking, fill a medium saucepan with water, 1-2 inches high, and bring to a boil.  Add pattypan squash and cook 7-8 minutes.  When done, drain and let cool.
4. Meanwhile, finely chop zucchini and green onion by hand or in a food processor.
5. When the quinoa is cooked, remove the garlic cloves, and mix in the tomato paste, butter, and zucchini mixture.
6. Once cool, cut off the stems of the squash and carefully spoon out the insides- don’t throw those away though!  Add the spooned out squash to the quinoa mixture.  (Don”worry if you pierce the bottom of the squash, I did and mine turned out great anyway!)  Season the quinoa-zucchini-pattypan mixture to taste with salt and pepper.
7. Place the hollowed out squash in a baking pan- I used my Pyrex loaf pan and it was the perfect size for my 3 squash.  Stuff your squash with the quinoa mixture until it overflows, and spoon the rest around the squash (you’ll most likely have more filling than you can stuff the squash with).
8. Bake the stuffed squash for 20-25 minutes.


Enjoy!


Source: Inspired by Oh She Glows