Rainbow Tomato Crostini

Hello friends! I’m sorry I’ve been a bit MIA lately! I had every intention of getting some posts up this weekend, including a Super Saturday post, but unfortunately I was infected with a terrible summer cold and was down for the count most of the weekend. I totally blame my boyfriend for getting me sick!!! I’m on the mend now, not 100% but waaaaaaay better than yesterday when it hurt to even get up off the couch. Hopefully this week I’ll be able to get back to posting more often. I have to finish sharing my recipes from vacation, and some things I’ve made since I’ve been back! Also- if you look on the right side of this page I decided to add a new feature- my weekly menu! If you need some inspiration, or if you are like me and just like to see what other people are eating, now you can! I’ll link to those recipes that are available online so you can check them out if you want! I’ll also include what I’m having for lunch as well, if you need some lunchbox inspiration.

So this was a super-simple appetizer that I made on vacation, inspired by the cover of the July/August issue of Martha Stewart Living. She calls for grilling the bread, which would be awesome, and also for a loaf of rustic ciabatta bread. Because I was on vacation, and was limited in what the local grocery store carried, I used smaller ciabatta breadsticks. They worked out wonderfully, but feel free to use what you have, whether it be the breadsticks, a loaf of ciabatta, or even baguette slices.

Rainbow Tomato Crostini

Rainbow Tomato Crostini

Ingredients:

3 ciabatta breadsticks, halved lengthwise (or a regular ciabatta loaf if you’d like)

1-2 cloves of garlic, cut in half

Multicolored tomatoes (I used 1 large red, 1 large yellow, and a medium-sized green), thinly sliced

Extra-virgin olive oil

Salt and pepper

Directions:

1. Preheat oven to 350 degrees. Place breadstick halves on a baking sheet, and brush with olive oil. Bake about 5-10 minutes until lightly crispy.

2. When toasted, remove from oven, let cool slightly, and then rub with a garlic clove.

3. Layer on your tomatoes, arranging by color. Sprinkle with salt and pepper, and drizzle with olive oil. Carefully cut into smaller wedges, and serve.
Source: adapted from Martha Stewart Living, July/August 2013

Summer Vegetable Soup

Every week I try to make a healthy lunch that will last me for the week. I love not having to put something together every single night… and I feel much better about taking something homemade rather than store-bought (although sometimes in a pinch that stuff is awesome!). Soups make a great lunch. Usually they taste even better after sitting for a couple of days as it allows the flavors to meld together. This vegetable soup is a delicious, healthy, and very customizable recipe that made for an awesome lunch. You can use pretty much any vegetable you have on hand, mix and match depending on your own personal preferences, use up frozen vegetables from the freezer, and little bits of leftover pasta. This was a great recipe to use in my quest to clean out my fridge/freezer/pantry. I had an open bag of frozen peas that I threw into this, a bit of Israeli couscous, some red potatoes that were on their last hurrah, a can of cannellini beans that has been in my pantry forever, and all I had to buy was some zucchini, vegetable stock and green beans. You can throw in some diced sweet potatoes, fresh tomatoes instead of canned, yellow squash, spinach, leeks instead of onions… the sky’s the limit.

Summer Vegetable Soup

Summer Vegetable Soup

Serves 6

Ingredients:

1 Tbsp olive oil

1 small onion, quartered and sliced thin

6 cups low-sodium vegetable broth (or more, if desired to make the soup broth-ier)

1-2 small zucchinis, halved lengthwise and sliced into 1/4-inch pieces

1 (15-oz) can cannellini beans (or Navy beans)

5 small red potatoes, diced

1 cup peas (fresh or frozen)

1 cup corn (fresh or frozen)- I omitted this because I didn’t have any

1 cup green beans (fresh or frozen), cut into 1-inch pieces

1 (14-oz) can diced tomatoes, with juice

1/2 tsp ground black pepper

3/4 tsp Kosher salt

1/8 tsp tumeric

2-4 ounces Israeli couscous (or other small pasta shape), optional

2 Tbsp tomato paste

Directions:

1. Place a large pot or Dutch oven over medium heat. Add onions and saute for 3-4 minutes, until softened.

2. Add the vegetable broth, zucchini, beans, potatoes, peas, corn, green beans, diced tomatoes and juice, salt, pepper, and tumeric. Bring to a boil, and then lower heat to a simmer, cover, and simmer for 25-30 minutes, until the vegetables are tender. If you are using pasta, add when there is about 10-15 minutes left of cooking time.

3. Remove from the heat, and stir in the tomato paste. Season to taste with salt and pepper.

Source: barely adapted from Prevention RD (originally adapted from food.com)

Parmesan Pesto Tilapia

I told you I’d be back later with a recipe 🙂 This is a great one for summer. Just a few ingredients (including those delicious summer tomatoes that should be showing up soon), a short amount of time under the broiler, and you have a really yummy dinner! This is also a great way to use up some of the basil you have growing in your garden by making it into pesto! I can’t wait until I have enough basil in my garden to make pesto. It’s getting there, and I’m just keeping my fingers crossed that the woodchucks and bunnies don’t get to it first… They’ve so far been staying away from most of my vegetables/herbs (fingers crossed), and just going after one of my pots of parsley, one jalapeno plant (leaving the other 5 alone?), and my flowers… I’m thinking of planting some distracting plants that they can eat in hopes that that’ll satisfy them!

Parmesan Pesto Tilapia

Parmesan Pesto Tilapia

Serves 4

Ingredients:

4 (6-oz) tilapia filets

1/2 cup parmesan cheese, grated

1/4 cup pesto (storebought or homemade)

1 cup tomatoes, chopped

Salt and pepper

Ingredients:

1. Preheat broiler. Line a baking sheet with aluminum foil and spray with nonstick cooking spray. Season tilapia with salt and pepper, and place on the baking sheet. Top each filet with 2 Tbsp of Parmesan cheese. Broil for 9-11 minutes until fish is cooked through.

2. Remove from oven, top each piece with 1 Tbsp of pesto, and chopped tomatoes.

Source: Pinch of Yum

Quinoa Salad with Black Beans and Toasted Cumin Seeds

Happy Monday all! We’ve made it through the first day of the week, and hopefully everyone survived intact! Personally, I find Tuesdays to be even harder though, so if I can just make it through tomorrow I’ll be okay 🙂

I thought that you would appreciate a  healthy, refreshing salad to start off this week, especially with the high humidity and temperatures that are hitting the Northeast, and other parts of the country as well. Today it was over 90 degrees here, and that will continue for the next couple of days. This is a perfect salad for summer… good for lunch, a light dinner, or a dish to bring to a picnic or party. I made my salad with honey (as I didn’t have agave in my pantry), but if you use agave then this will be vegan. It is also gluten-free, so it great for those with food restrictions and/or allergies! Most importantly, it is delicious!

Quinoa Salad with Black Beans and Toasted Cumin Seeds

Quinoa Salad with Black Beans and Toasted Cumin Seeds

Serves 4

Ingredients:

2 cups cooked quinoa

1/4 tsp salt

2 tsp cumin seeds

1 cup plum tomatoes, finely diced

3 Tbsp freshly squeezed lime juice (about 3-4 limes)

2 tsp honey (or light agave nectar)

1 tsp grapeseed oil

1 (15-ounce) can black beans, drained and rinsed

1 cup scallions, finely chopped

1/2 cup cilantro, chopped

1 avocado, diced (optional)

1 jalapeno, seeded and diced (optional)

Mixed greens, for serving (optional)

Directions:

1. To toast the cumin seeds, place a small skillet over low heat, add the cumin seeds, and toss for about 5 minutes, until fragrant.

2. In a large bowl, add the toasted cumin seeds, tomatoes, lime juice, honey or agave, and grapeseed oil. Mix together. Add the quinoa, and stir well to combine. Add the beans, scallions, cilantro, avocado (if using), and jalapenos (if using), and mix in gently. Season to taste with salt. Serve over greens, if desired.

Source: slightly adapted from Appetite for Reduction

Chicken Cobb Salad

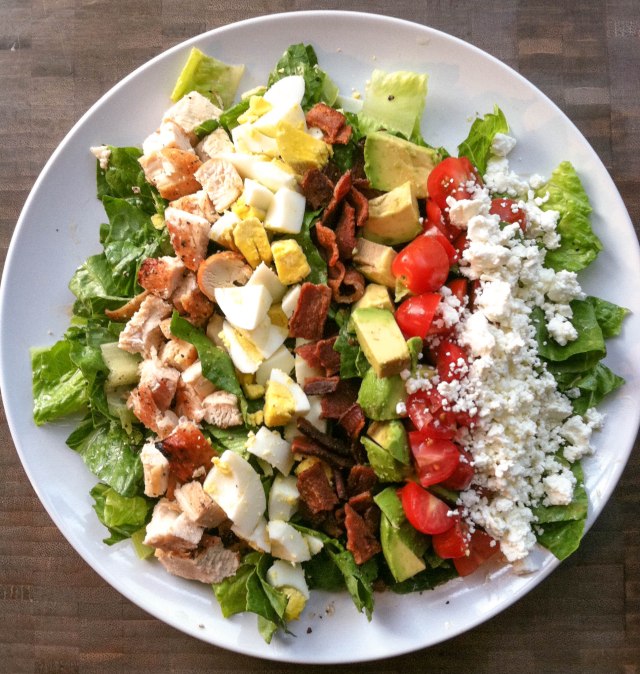
Do you ever feel like you need to get some vegetables into your body, stat?! I do! Especially after many indulgences in a row, my body just craves veggies! This is a great way to incorporate vegetables into a meal in a guy-friendly way. I think a hearty salad that has the good stuff, but also some chicken, bacon and cheese is the perfect way to get my boyfriend to eat his vegetables, and be happy about it!  This classic salad was so tasty, and also very beautiful looking! Of course, when you eat it it becomes jumbled like any normal salad, but at least for a couple of minutes it looks so orderly and elegant! … and now I’m really inspired to try some other variations on the Cobb salad like this one, this one and this one.

Chicken Cobb Salad

Chicken Cobb Salad

Serves 4

3 Tbsp red wine vinegar

2 Tbsp olive oil

1 tsp Dijon mustard

2 (6-ounce) boneless, skinless chicken breasts, trimmed

4 slices bacon, cooked until crisp, and crumbled

2 hard-boiled eggs

1 large head romaine lettuce, shredded

1/2 ripe avocado, pitted, peeled and cut into 1/2-inch dice

2 plum tomatoes, cut into 1/2-inch dice

3 ounces feta cheese, crumbled

Coarse salt and freshly ground black pepper

Directions:

1. Preheat broiler, place oven rack 6-inches from top. Line a baking sheet with aluminum foil, and spray with cooking spray. Season chicken with salt and pepper, and place on baking sheet. Broil for 4-8 minutes until lightly browned. Flip chicken over, and broil for 6-8 minutes more, until chicken is fully cooked. Let cool until they can be handled. Chop into 1/2-inch cubes and set aside.

2. In a small bowl, whisk together the vinegar, olive oil, dijon mustard, and salt and pepper to taste. Toss the lettuce with the dressing.

3. To assemble salads, place a serving of lettuce on each plate, and then arrange the chicken, eggs, bacon, cheese, avocado, and tomato on top of the lettuce in rows.

Source: adapted from The Cook’s Illustrated Cookbook and Everyday Food: Great Food Fast


Cod en Papillote with Zucchini, Tomatoes, and Basil

Another night, another solo dinner, and this time, rather than going vegetarian, I decided to buy some seafood for myself!  I believe I’ve mentioned it in the past, but seafood, really any kind, is my favorite type of food in the world.  I don’t buy it as often as I’d like because of the expense involved, but ideally I’d like to incorporate at least two days worth of seafood in my weekly menus.  At the moment, I’m lucky if I can do one, but someday…. someday….  Since I was just cooking for myself tonight though, the expense was minimal, hooray!!

I’ve been intrigued by the whole parchment/foil packet cooking method for a while now.  I have quite a few recipes bookmarked that I’d like to try like this, and this, and this, but I just haven’t gotten around to making them.  It’s not that I’m intimidated, in fact, I didn’t doubt that this was a simple cooking method, it’s just one of those things that I kept putting off for no reason whatsoever!  I decided that tonight was the night, and because I had some yellow zucchini from the farmer’s market to use, and my cherry tomatoes and basil are exploding in my garden… and because this is another thing that my boyfriend wouldn’t eat due to his aversion to zucchini and tomatoes (craziness!!), this was absolutely perfect for just me.  In fact this was soooooo good that I want to cook this for my family when I go on vacation with them in a week- oh my goodness, I just can’t wait for vacation!!!!!
This is an easily customizable recipe which makes it just perfect no matter what ingredients you have on hand, and what your personal preferences are.  I wouldn’t omit the fish (obviously!), but you could use any kind of firm, flaky white fish, but you could customize the veggies to your choosing.  Serious Eats, which is where this recipe comes from, mentions sugar snap peas and asparagus as potential substitutions.  
Seriously guys, make this!!!!  It is so flavorful and amazingly delicious.  It is also incredibly easy and fancy looking.  It’s perfect for a solo dinner, or a dinner party!
Cod en Papillote with Zucchini, Tomatoes and Basil
Serves 1

Ingredients:
1 small to medium zucchini (green or yellow), thinly sliced
1 boneless, skinless cod fillet (about 6 ounces)
Kosher salt and freshly ground black pepper, to taste
A pinch of dried red chili flakes
1 clove garlic, minced
8 leaves fresh basil
8 cherry tomatoes
1 tbsp olive oil
1 tbsp unsalted butter, cut into about 6 small pieces
1 tbsp dry white wine
Directions:
1. Preheat oven to 450 degrees.  Tear off about a 12″ by 24″ piece of parchment or tinfoil and fold in half to make a crease.  Unfold, and place on a baking sheet.  
2. Assemble the packet by laying down your zucchini in the center of one of the sides of the parchment paper, leaving at least a one-inch border.  Place cod on the bed of zucchini, then sprinkle on salt and pepper, chili flakes and garlic.  Place the basil leaves on top, and your cherry tomatoes (they will probably want to roll off, but I found placing them stem side down helps).  Then top with your butter pieces, olive oil and white wine.
3. Fold the parchment paper in half over the fish and start crimping from one corner, and going all the way around to the other side to secure.  
4. Bake for about 12 minutes, until the fish is cooked though.  
5. Once done, you can place the parchment packet directly on your plate, and open at the dinner table.
Enjoy!!
Source: Slightly adapted from Serious Eats

Tomato and Almond Gazpacho

One of my favorite dishes that I cooked (well, I use the term “cook” loosely here!) on vacation was this tomato and almond gazpacho!  It is so summery and refreshing, and has such great texture from the addition of the almonds.  They also make this soup feel so much more substantial and satisfying than gazpachos I’ve had in the past (although I like those too).  Even my brother who is not the biggest fan of soup enjoyed this recipe (well, at least that’s what he told me and I don’t think he was just being polite… hopefully).  This is the first gazpacho I’ve ever made, and it definitely makes me want to experiment more!  Since summer has unofficially ended though, the experimentation is probably going to have to wait until Memorial Day.  In fact, I had a beef and mushroom stew simmering on the stove just yesterday… perfect for fall!  
Speaking of fall, it rivals spring for my favorite season, and includes one of my favorite holidays, Halloween(!!), so hopefully I’ll be getting back to being a good blogger, and making some delicious seasonal recipes, I do love the flavors of fall dearly- I’m ready for pumpkin, apples, squash, and lots of soups and stews!


Tomato and Almond Gazpacho
from Martha Stewart Living, August 2011
Serves 4

Ingredients:
2 pounds tomatoes (about 4), cored and coarsely chopped
1/2 English cucumber, peeled, seeded and coarsely chopped
1/2 onion, coarsely chopped
1 small garlic clove
2 ounces almonds (scant 1/2 cup), toasted (blanching the almonds prior is optional)
1/4 cup water
2 tbsp cider vinegar
2 tbsp extra-virgin olive oil, plus more for drizzling
Coarse salt and freshly ground pepper
Directions:
1. Place the tomatoes, cucumber, onion, garlic, almonds, water, vinegar, oil, and 2 1/4 tsp of salt in a blender, and puree until smooth.  Then season with pepper.
2. Refrigerate the gazpacho for at least 45 minutes. 
3. To serve, season with salt and pepper to taste right before serving, ladle into bowl, and drizzle with olive oil.
Notes:
  • I did not take the time to blanch the almonds when making this gazpacho, but it was delicious regardless, and the texture was great, so I’d say that’s entirely optional.
  • As I was working with limited cooking implements and ingredients as one is apt to do on vacation, I substituted cider vinegar and non-extra virgin olive oil in my gazpacho.  The original calls for extra-virgin olive oil, and sherry vinegar.  Either way you go it’ll still be wonderful, so if you don’t have sherry vinegar in your pantry, feel free to make a substitution.

A Memorial Day Meal: Part Deux

Here is the promised second half of my Memorial Day feast… the side dishes.


Spicy Potato Wedges


Ingredients:
Russet potatoes (1- however many you want, but 1 potato per person is a good idea)
Olive oil
Salt
Garlic Powder
Cayenne Pepper
Directions:
1. Preheat oven to 400 degrees.
2. Cut potatoes into wedges.  I’d recommend cutting into 6-8 wedges per potato depending on their size.
3. Toss the wedges in a bowl with a drizzle of olive oil, add a sprinkling of the salt and the other spices, and mix together to coat the potatoes.  I didn’t measure these, and it’s really up to your individual taste- like them spicy?  Add more cayenne.  Like them garlicky?  Add more garlic powder!  For a rough guide, I’d say for 4 potatoes you can use about 2 tbsp olive oil, 1/2 tsp salt, 1 tsp garlic powder, 1/4 tsp cayenne pepper.
4. Place potatoes on a baking pan, in a single layer.
5. Cook about 40 minutes, flipping the wedges once.

Tomato, Cucumber and Feta Salad


Ingredients:
2 pints cherry or grape tomatoes (quartered if cherry, halved if grape)
1/4 tsp salt
1/2 tsp sugar
2 cloves garlic, minced or pressed
1/2 tsp dried oregano
1 medium shallot, minced
1 tbsp red wine vinegar
2 tbsp extra virgin olive oil
Ground black pepper
1 small cucumber, peeled, seeded and diced into 1/2 inch chunks
1-2 tbsp fresh parsley, minced

Directions:
1. In a medium bowl, toss together tomatoes, salt and sugar.  Let sit for about 30 minutes.  Put the tomatoes in a salad spinner, and spin for about 1 minute, to remove seeds and juice.  Stir the tomatoes around several times while spinning.  If you don’t have a salad spinner, place the tomatoes in a bowl, cover securely with plastic wrap, and shake gently to loosen seeds, and release liquid.  Strain the liquid from the tomatoes through a fine mesh strainer into a measuring cup.
2. In a small saucepan, combine 1/2 cup of the reserved tomato liquid, garlic, oregano, shallot, and red wine vinegar, and heat on medium.  Simmer about 6-8 minutes, until the mixture is reduced.  Remove from the heat, pour into a small bowl, and let cook to room temperature.  When cooled, whisk in the olive oil, and season to taste with the black pepper.
3. Combine the tomatoes, cucumber, feta, parsley and dressing in a medium bowl.  Toss to combine.

Source: Annie’s Eats, originally from Cook’s Illustrated

Notes:

  • I used grape tomatoes in my salad, halving them.  It may take a bit of extra work to get the liquid and seeds to release from these, so you may have to toss the tomatoes around a bit more and squeeze them gently to release their seeds and a little more liquid.  I actually only got about 1/4 cup of tomato liquid for my dressing, but it still turned out perfectly fine, so don’t fret if the same happens to you.
Cheddar Cheese Biscuits
Makes about 8 biscuits

Ingredients:
2 cups unbleached all-purpose flour
2 tsp sugar
2 tsp baking powder
1/2 tsp salt
1/2 cup cheddar cheese, cut into 1/4 inch cubes
1 1/2 cups heavy cream
Directions:
1. Preheat oven to 425 degrees, placing over rack in upper middle position.
2. Line a baking sheet with parchment paper.
3. Combine flour, sugar, baking powder, and salt in a medium bowl.  Stir in cheese.  Pour 1 1/4 cup of the cream in, and stir together for about 30 seconds, or until it forms into dough.
4. Remove dough to a lightly floured surface.  Leave behind any dry pieces of flour in the bowl.  If there is extra flour in the bowl, combine with the remaining 1/4 cup of cream, in tbsp increments, until moistened.  When moistened, add them to the rest of the dough.  Knead for about 30 seconds, by hand, until the dough is smooth.
5. To make biscuit rounds, flatten the dough into a 1-inch thick circle.  Use a round biscuit cutter to make bisuits, and place them on baking sheet.  Reform circle with leftover dough, and cut more biscuits.  This will make about 8 biscuits.  You can also make biscuit wedges by placing the dough in an 8 inch cake pan, and flattening evenly.  Remove dough and place on lightly floured surface, and cut into 8 wedges.
6. Bake biscuits for 15-18 minutes.

Source: cooklikeachampionblog.com, originally adapted from Baking Illustrated


Notes:
  • When making my biscuits, I didn’t have any remaining flour in my bowl, so I ended up only using 1 1/4 cups of cream, so you may not need to do this step either. 
  • I ended up doing wedges because I realized as I was making these that I don’t have a biscuit cutter.  I’m sure I could have used something else to make a circle shape, but wedges are cool, so that’s what I went with.  I loved the cake pan trick, because it made a perfect circle with no effort, and so it was super easy to make equal sized wedges.
  • You can make these into regular biscuits by just omitting the cheddar cheese, the amount of the other ingredients remains the same- but why wouldn’t you want cheese?!?!?!?  I also think that adding bacon or scallions would be awesome in these biscuits.
  • Using diced cheese, rather than grated cheese, was an awesome idea- it gives you these little pockets of wonderful cheesy goodness.  I have to say these are the best biscuits I have ever made- although I still have yet to try duplicating Red Lobster’s biscuits…