Rainbow Tomato Crostini

Hello friends! I’m sorry I’ve been a bit MIA lately! I had every intention of getting some posts up this weekend, including a Super Saturday post, but unfortunately I was infected with a terrible summer cold and was down for the count most of the weekend. I totally blame my boyfriend for getting me sick!!! I’m on the mend now, not 100% but waaaaaaay better than yesterday when it hurt to even get up off the couch. Hopefully this week I’ll be able to get back to posting more often. I have to finish sharing my recipes from vacation, and some things I’ve made since I’ve been back! Also- if you look on the right side of this page I decided to add a new feature- my weekly menu! If you need some inspiration, or if you are like me and just like to see what other people are eating, now you can! I’ll link to those recipes that are available online so you can check them out if you want! I’ll also include what I’m having for lunch as well, if you need some lunchbox inspiration.

So this was a super-simple appetizer that I made on vacation, inspired by the cover of the July/August issue of Martha Stewart Living. She calls for grilling the bread, which would be awesome, and also for a loaf of rustic ciabatta bread. Because I was on vacation, and was limited in what the local grocery store carried, I used smaller ciabatta breadsticks. They worked out wonderfully, but feel free to use what you have, whether it be the breadsticks, a loaf of ciabatta, or even baguette slices.

Rainbow Tomato Crostini

Rainbow Tomato Crostini

Ingredients:

3 ciabatta breadsticks, halved lengthwise (or a regular ciabatta loaf if you’d like)

1-2 cloves of garlic, cut in half

Multicolored tomatoes (I used 1 large red, 1 large yellow, and a medium-sized green), thinly sliced

Extra-virgin olive oil

Salt and pepper

Directions:

1. Preheat oven to 350 degrees. Place breadstick halves on a baking sheet, and brush with olive oil. Bake about 5-10 minutes until lightly crispy.

2. When toasted, remove from oven, let cool slightly, and then rub with a garlic clove.

3. Layer on your tomatoes, arranging by color. Sprinkle with salt and pepper, and drizzle with olive oil. Carefully cut into smaller wedges, and serve.
Source: adapted from Martha Stewart Living, July/August 2013

Bean and Corn Salad

Hello all! I hope that everyone has been having a great long weekend! It was a fun one for me- especially since I went to a party on Saturday to celebrate my best friend’s 30th birthday!! It was so much fun just hanging out, eating yummy Mexican food (she had it catered by a local Mexican place), and even trying my hand at busting open a pinata! That’s something I don’t think I’ve ever done- even when I was a kid. It was totally disorienting, and I’m sure that I looked like a fool as I awkwardly stumbled around swinging a bat.

I’m still trying to get back in the swing of things, and I definitely need to get back to regular posting on the blog, and sharing yummy recipes with you! This bean and corn salad was something I threw together for one of our potluck nights on vacation. I had an idea in mind of what would be going in it, as I’ve had similar salads in the past. I debated whether or not to cook the corn, or leave it raw, and you can definitely do either. The salad is very versatile, so you can work with what you have! Don’t have scallions? Use red onion! Don’t have lime juice? Use lemon! Have red or green bell peppers you want to use up? Chop them up, and throw them in there! Want it spicier? Leave in the jalapeno seeds! Whatever floats your boat 🙂


Bean and Corn Salad

Ingredients:

3 fresh ears of corn, kernels removed

1 Tbsp extra virgin olive oil

1 can black beans, drained and rinsed

1 can pinto beans, drained and rinsed

1 pint cherry or grape tomatoes, diced

1/2 bunch cilantro, chopped

1 jalapeno, ribs and seeds removed, minced

3 scallions, thinly sliced

Juice of 1 lime, freshly squeezed

Salt and pepper

Directions:

1. Place a large skillet over medium-high heat, and add oil. When hot, add corn kernels to skillet, and saute, stirring frequently, until cooked, and starting to char a bit- about 5-10 minutes. Remove from heat, and let cool.

2. In a large bowl, mix together the rinsed and drained beans, tomatoes, cilantro, jalapeno, and scallions. When cooled down, add corn. Mix in lime juice, and season to taste with salt and pepper. Serve immediately, or let sit for a little while to let flavors meld together!

Source: Original Recipe

Super Saturday: Summer Vacation Edition

Photo Source: seasidevacations.com

Photo Source: seasidevacations.com

As I’ve mentioned… because I can’t think of anything else, I’m going on vacation just a week from now!!! Because of this, and because my mind seems to be getting in vacation mode already, I thought that today for Super Saturday, I’d focus on all things related to vacation!  Oh, how I can’t wait.

Vacation Reading

One of the best things about vacation is having long stretches of uninterupted time that can be devoted to reading. I usually bring a bunch of magazines to read at the beach, but I also try to read a bunch of books as well. The beach is the perfect place to delve into a good book. I think that vacation is a good time for some light(er) reading, and here are some of the books that are on my radar for beach reads.

Joyland

Joyland by Stephen King- I’m a big Stephen King fan, so any book that he’s written is automatically on my radar. This seems like a quicker read than some of his other works (not that reading a long book is a problem, but sometimes shorter is good). Ghosts, carnivals, and a murder mystery sound like something that’ll be right up my alley.

The Cuckoo's Calling

The Cuckoo’s Calling by J.K. Rowling (under pen-name Robert Galbraith)- When I heard that this book was actually written by the author of the Harry Potter series, it intrigued me, and made me check out the description on Amazon. When I read that it was about a detective investigating a mysterious suicide I became even more interested. As you can probably already tell, I love mysteries. In fact, one of my favorite shows growing up was Murder, She Wrote…. and I of course loved the Encyclopedia Brown series.

The Man Who Ate Everything

The Man Who Ate Everything by Jeffrey Steingarten- I know this will be a shock, but one of my other favorite genres of books is food writing. I’ve been wanting to read this book forever, and I think that vacation will be the perfect time to do so! I love to read about people’s experiences with food and I’ve heard this book is especially funny, and “mouth-watering” as well.

The Perks of Being a Wallflower

The Perks of Being a Wallflower by Stephen Chbosky- This coming-of-age novel is one that has been on my radar for a while. Set in high school, from the point of view of Charlie, and written in his point of view in a series of letters, this book about a shy “wallflower” seems like something I’ll be able to relate to, as I also have always been a wallflower… and even though I have been out of high school for over a decade now, I think that since my recent positive experience with The Fault in Our Stars, that I will still find this book relateable even at the ripe old age of 30.

The Yard

The Yard by Alex Grecian- Okay, I needed just one more mystery novel.. I can’t help it! This book takes place in Victorian London, right after the reign of Jack the Ripper, and focuses on the “Murder Squad”, a group of 12 detectives hired to solve murders, after Scotland Yard’s failure to catch Jack the Ripper.  I mean, how great does that sound?! I hope it lives up to my expectations.

Drooling Over

Tomatoes!! My cherry tomatoes are finally ripening, and I’m so excited to be able to use them in recipes (and just eat them plain too!). I expect to be buying a bunch of fresh tomatoes on vacation as well, as there is a farmer’s market that comes to town a couple days a week, and a small market that sells local fruits and vegetables daily.

Photo Source: npr.org

Photo Source: npr.org

This Avocado Shrimp Salsa from Smitten Kitchen

This Heirloom Tomato Pizza from Heather Cristo

This Caprese Chicken from The Novice Chef

These Soft Tacos with Roasted or Grilled Tomatoes and Summer Squash from The New York Times

These Roasted Tomato and Goat Cheese Crostini from Cook Like a Champion

This Easy Feta Dip from The Girl Who Ate Everything

Lusting After

This Coral Chevron Beach Tote

Coral Chevron Beach Tote

from Vianney Creations on etsy.com

This Starfish Beach Towel

Starfish Beach Towel

from L.L. Bean

This beach chair

Beach Chair

from Land’s End

These cute and colorful sandals 

Sandals

from Old Navy

Parmesan Pesto Tilapia

I told you I’d be back later with a recipe 🙂 This is a great one for summer. Just a few ingredients (including those delicious summer tomatoes that should be showing up soon), a short amount of time under the broiler, and you have a really yummy dinner! This is also a great way to use up some of the basil you have growing in your garden by making it into pesto! I can’t wait until I have enough basil in my garden to make pesto. It’s getting there, and I’m just keeping my fingers crossed that the woodchucks and bunnies don’t get to it first… They’ve so far been staying away from most of my vegetables/herbs (fingers crossed), and just going after one of my pots of parsley, one jalapeno plant (leaving the other 5 alone?), and my flowers… I’m thinking of planting some distracting plants that they can eat in hopes that that’ll satisfy them!

Parmesan Pesto Tilapia

Parmesan Pesto Tilapia

Serves 4

Ingredients:

4 (6-oz) tilapia filets

1/2 cup parmesan cheese, grated

1/4 cup pesto (storebought or homemade)

1 cup tomatoes, chopped

Salt and pepper

Ingredients:

1. Preheat broiler. Line a baking sheet with aluminum foil and spray with nonstick cooking spray. Season tilapia with salt and pepper, and place on the baking sheet. Top each filet with 2 Tbsp of Parmesan cheese. Broil for 9-11 minutes until fish is cooked through.

2. Remove from oven, top each piece with 1 Tbsp of pesto, and chopped tomatoes.

Source: Pinch of Yum

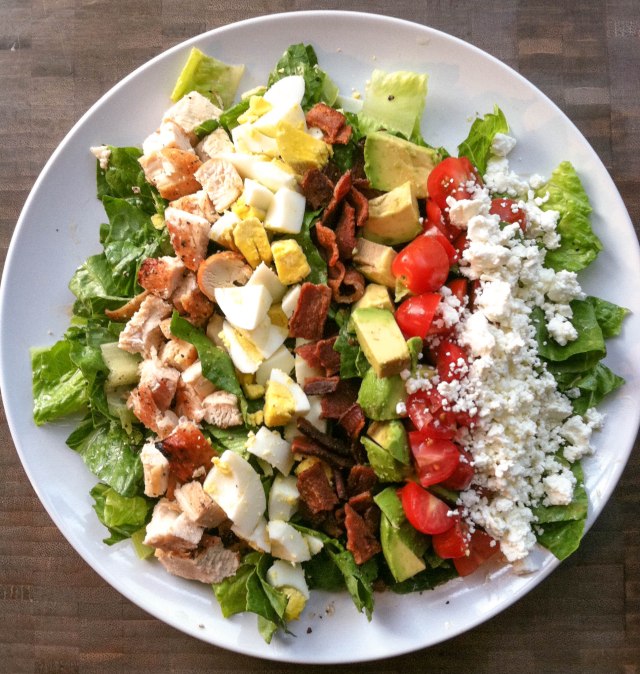
Buffalo Chicken Cobb Salad with Buffalo Deviled Eggs

We’ve made it halfway through the week guys!! Aren’t you excited?! I know I am… but I’ll be even happier when tomorrow is over. The hardest days of my week are always Tuesday and Thursday, and I always feel such a sense of relief when Thursday is done with. If only there was a way to fast-forward through the work day… but alas, that has not been invented yet. I discovered something this week though that is making the work week infinitely better, and that is the amazing fact that you can watch “Are You Afraid of the Dark?” on Amazon instant watch… for free if you are an Amazon Prime member. Oh yes, this was one of my favorite childhood shows, and it is still extremely entertaining. We didn’t have cable until I was in middle school, so when we would visit my Grandparents, one of the things I looked forward to was watching Nickelodeon, and the show I most looked forward to (and always wished would be on) was “Are You Afraid of the Dark?” That and “Clarissa Explains It All” were my two top shows I loved as a kid… and incidentally, “Clarissa Explains It All” is available to watch as well. My life might just be complete now!!! Oh, and they have “Hey Dude”…. now if only they would add “The Secret World of Alex Mack”.

Buffalo Chicken Cobb Salad with Buffalo Deviled Eggs

So now that you’ve waxed nostalgic over old Nickelodeon shows with me, it’s time for the recipe! When I saw this buffalo chicken Cobb salad over on Iowa Girl Eats it screamed for me to make it because as you know,  I love all things buffalo. This is a great way to add excitement to a salad, and an awesome variation on the classic Cobb salad. I love the addition of the buffalo deviled eggs, and they would be great on their own as well for an appetizer! This is also a boyfriend-approved salad, so like the classic Cobb salad, make this if you are trying to get more vegetables into your significant other!

Buffalo Chicken Cobb Salad

Serves 4

Ingredients:

2 (6-oz) boneless, skinless chicken breasts, trimmed

1/4 buffalo wing sauce (I used Frank’s)

Salt and pepper

4 slices bacon, cooked until crisp, and crumbled

1 large head romaine lettuce, shredded

1 cup grape tomatoes, halved

1 ripe avocado, pitted, peeled and cut into 1/2-inch dice

1/2 cup feta cheese, crumbled

Ranch dressing (optional)

For buffalo deviled eggs:

4 large eggs

1 1/2 Tbsp ranch or blue cheese dressing

1 Tbsp buffalo sauce

Directions:

1. To make buffalo deviled eggs: Place eggs in medium saucepan, and cover with water by 1-inch. Bring to a boil over high heat. When vigorously boiling, turn off heat, and let eggs sit for 15-18 minutes*. Drain, run under cold water until you can handle them. Peel the eggs, and remove the yolk to a small bowl. Add the ranch or blue cheese dressing and the buffalo sauce to the yolks, and mash together until smooth. Cut the egg whites in half again, so that you have quarters, and stuff with the egg yolk mixture. I like to put my egg yolks in a ziplock bag, snip a small hole at the end, and pipe the filling into the eggs. *If you have your own foolproof method for making hard-boiled eggs, please feel free to use that instead of this method 🙂

2. To make the chicken: Preheat broiler, place oven rack 6-inches from top. Line a baking sheet with aluminum foil, and spray with cooking spray. Season chicken with salt and pepper, and place on baking sheet. Broil for 4-8 minutes until lightly browned. Flip chicken over, and broil for 6-8 minutes more, until chicken is fully cooked. Let cool until they can be handled. Chop into 1/2-inch cubes place in medium bowl. Mix with buffalo sauce.

3. To assemble salad: To assemble salads, place a serving of lettuce on each plate, and then arrange the buffalo chicken, deviled eggs, bacon, cheese, avocado, and tomato on top of the lettuce in rows. Drizzle ranch dressing on top if desired.

Source: barely adapted from Iowa Girl Eats and my Chicken Cobb Salad

Quinoa Salad with Black Beans and Toasted Cumin Seeds

Happy Monday all! We’ve made it through the first day of the week, and hopefully everyone survived intact! Personally, I find Tuesdays to be even harder though, so if I can just make it through tomorrow I’ll be okay 🙂

I thought that you would appreciate a  healthy, refreshing salad to start off this week, especially with the high humidity and temperatures that are hitting the Northeast, and other parts of the country as well. Today it was over 90 degrees here, and that will continue for the next couple of days. This is a perfect salad for summer… good for lunch, a light dinner, or a dish to bring to a picnic or party. I made my salad with honey (as I didn’t have agave in my pantry), but if you use agave then this will be vegan. It is also gluten-free, so it great for those with food restrictions and/or allergies! Most importantly, it is delicious!

Quinoa Salad with Black Beans and Toasted Cumin Seeds

Quinoa Salad with Black Beans and Toasted Cumin Seeds

Serves 4

Ingredients:

2 cups cooked quinoa

1/4 tsp salt

2 tsp cumin seeds

1 cup plum tomatoes, finely diced

3 Tbsp freshly squeezed lime juice (about 3-4 limes)

2 tsp honey (or light agave nectar)

1 tsp grapeseed oil

1 (15-ounce) can black beans, drained and rinsed

1 cup scallions, finely chopped

1/2 cup cilantro, chopped

1 avocado, diced (optional)

1 jalapeno, seeded and diced (optional)

Mixed greens, for serving (optional)

Directions:

1. To toast the cumin seeds, place a small skillet over low heat, add the cumin seeds, and toss for about 5 minutes, until fragrant.

2. In a large bowl, add the toasted cumin seeds, tomatoes, lime juice, honey or agave, and grapeseed oil. Mix together. Add the quinoa, and stir well to combine. Add the beans, scallions, cilantro, avocado (if using), and jalapenos (if using), and mix in gently. Season to taste with salt. Serve over greens, if desired.

Source: slightly adapted from Appetite for Reduction

Chicken Cobb Salad

Do you ever feel like you need to get some vegetables into your body, stat?! I do! Especially after many indulgences in a row, my body just craves veggies! This is a great way to incorporate vegetables into a meal in a guy-friendly way. I think a hearty salad that has the good stuff, but also some chicken, bacon and cheese is the perfect way to get my boyfriend to eat his vegetables, and be happy about it!  This classic salad was so tasty, and also very beautiful looking! Of course, when you eat it it becomes jumbled like any normal salad, but at least for a couple of minutes it looks so orderly and elegant! … and now I’m really inspired to try some other variations on the Cobb salad like this one, this one and this one.

Chicken Cobb Salad

Chicken Cobb Salad

Serves 4

3 Tbsp red wine vinegar

2 Tbsp olive oil

1 tsp Dijon mustard

2 (6-ounce) boneless, skinless chicken breasts, trimmed

4 slices bacon, cooked until crisp, and crumbled

2 hard-boiled eggs

1 large head romaine lettuce, shredded

1/2 ripe avocado, pitted, peeled and cut into 1/2-inch dice

2 plum tomatoes, cut into 1/2-inch dice

3 ounces feta cheese, crumbled

Coarse salt and freshly ground black pepper

Directions:

1. Preheat broiler, place oven rack 6-inches from top. Line a baking sheet with aluminum foil, and spray with cooking spray. Season chicken with salt and pepper, and place on baking sheet. Broil for 4-8 minutes until lightly browned. Flip chicken over, and broil for 6-8 minutes more, until chicken is fully cooked. Let cool until they can be handled. Chop into 1/2-inch cubes and set aside.

2. In a small bowl, whisk together the vinegar, olive oil, dijon mustard, and salt and pepper to taste. Toss the lettuce with the dressing.

3. To assemble salads, place a serving of lettuce on each plate, and then arrange the chicken, eggs, bacon, cheese, avocado, and tomato on top of the lettuce in rows.

Source: adapted from The Cook’s Illustrated Cookbook and Everyday Food: Great Food Fast


Simple Beef Chili with Kidney Beans

Simple Beef Chili

I made this chili a couple of weeks ago on one of those days where winter was still trying to keep its grip on us. Chili is the perfect comfort food- it is on the same plane as soups and stews. My dad makes a mean chili. Growing up chili was usually a meal for a Sunday. I remember coming downstairs in the morning before church, seeing the crock-pot sitting on the counter, already simmering away as my dad always wakes up super-early, and getting very excited about the deliciousness that would await us later. I loved coming home from church to the delicious chili-scented air. I’m pretty sure he never follows a recipe, adding a little of this, and a little of that, and having it be the same but also unique each time (if that makes any sense).

Me… I’m sure I could throw together some chili without following a recipe as well, although I’m not sure it’d live up to my dad’s, but I really love trying out the numerous chili recipes out there as well. The Cook’s Illustrated Cookbook alone has 6 different recipes for chili, and I fully intend to try them all! I decided to make this one first, as I was lured in by the ingredient list which includes pretty much all pantry staples in my home. Ron says this is the best chili I’ve made yet (and I’ve tried a bunch of recipes), so it was definitely a success! It’s very simple (as the title states), but it still takes its time to cook, so it’s definitely best for a weekend or day off. I made it on a weeknight, and so we didn’t end up eating until 9:30 this particular night… the wait was so worth it though!

Simple Beef Chili

Simple Beef Chili with Kidney Beans

Serves 4-5

Ingredients:

1 Tbsp vegetable oil

1 onion, chopped fine

1 red bell pepper, stemmed, seeded, and cut into 1/2-inch pieces

3 garlic cloves, minced

2 Tbsp chili powder

1 1/2 tsp ground cumin

1 tsp ground coriander

1/2 tsp red pepper flakes

1/2 tsp dried oregano

1/4 tsp cayenne pepper

1 lb 85% lean ground beef

1 (15-oz) can red kidney beans, rinsed

1 (14.5-oz) can diced tomatoes

1 (14.5-oz) can tomato puree

Salt

Optional:

Lime wedges

Cheddar cheese

Tortilla chips

Diced avocado

Cilantro

Scallions

Sour Cream

Directions:

1. Place a Dutch oven over medium-heat, and add oil. Heat until shimmering. Add onions, bell peppers, garlic, chili powder, cumin, coriander, red pepper flakes, oregano and cayenne pepper. Cook about 10 minutes, stirring occasionally, until the vegetables are softened and slightly browned.

2. Increase the heat to medium-high and add the ground beef. Cook until no longer pink, about 3-4 minutes, stirring and breaking up with a spoon.

3. Add the beans, diced tomatoes (with juices), tomato puree and 1/4 tsp salt. Bring to a boil, then reduce heat to low and cover. Cook for an hour, stirring occasionally. Then remove the cover, and cook for another hour, stirring occasionally. (If the mixture begins to stick, you can add up to 1/2 cup water.)

4. Season with salt to taste. Serve with any optional condiments desired!

Source: The Cook’s Illustrated Cookbook

Buffalo Chicken Salad with Avocado Ranch Dressing

Buffalo chicken has to be one of my favorite foods ever…. and of course it’s one of my boyfriend’s favorites! I love it in pretty much any incarnation, whether it be the classic buffalo chicken wings, or a twist on the classic, such as a topping on a pizza, inside egg rolls, in potato skins, etc. If it has buffalo chicken in the title, it can pretty much be guaranteed that I’ll try it.  When this recipe popped up on Smells Like Home a month ago, I immediately put it at the top of my “make after this detox” list. Ron was all for it because even though it’s a healthy salad, buffalo chicken makes everything exciting!

The buffalo chicken in this recipe is baked, which cuts the guilt down even further. It’s breaded in a toasted panko breadcrumb coating, and baked on a wire rack, which ensures that the chicken will stay crispy, rather than soggy.  The creamy avocado ranch dressing is a perfect accompaniment to the salad, although if you wanted, you could certainly serve it with a regular ranch or blue cheese dressing. I will most definitely be making this regularly. Ron has already requested a repeat of this meal, and I will be fulfilling that request soon.

Buffalo Chicken Salad
Serves 2-4 (Depending on how hungry you are!)

Ingredients:
1 recipe buffalo chicken (recipe follows)
Avocado ranch dressing (recipe follows)
Lettuce
Cherry or grape tomatoes
Blue, feta or cheddar cheese
Crumbled bacon(optional)
Scallions or red onions (optional)
Celery (optional)

Directions:
1. Assemble individual salads. Place buffalo chicken on top. Drizzle dressing over salad.

Buffalo Chicken
Ingredients:
2 cups panko breadcrumbs
2 Tbsp canola oil
1/2 cup all-purpose flour
1 tsp garlic powder
1/2 tsp kosher salt
1/4 tsp cayenne pepper (optional)
3 large egg whites
1 Tbsp water
1 Tbsp Dijon or whole grain mustard
1 tsp minced fresh thyme or 1/4 tsp dried thyme
Cooking spray
1 lb chicken tenderloins ( or boneless skinless chicken breasts cut into 3/4-inch strips
1 cup buffalo wing sauce (I used Frank’s Red Hot Original)
3 Tbsp salted butter

Directions:
1. Preheat oven to 475 degrees. Line a baking sheet with tinfoil, and place a wire rack on the sheet. Spray with nonstick cooking spray.
2. Place a large skillet over medium-high heat, and add canola oil and breadcrumbs. Toss together and stir until the breadcrumbs are golden brown, about 8-10 minutes. Place in a shallow dish or pie plate when toasted.
3. In a second dish or pie plate, stir together the flour, garlic, salt and cayenne pepper, if using. In a medium bowl, whisk together the egg whites, water, mustard and thyme.
4. To prepare chicken, dredge each piece in the flour mixture, then the egg whites, then the breadcrumbs. Place on the prepared wire rack on the baking sheet. When all the chicken is coated, spray the tops with nonstick cooking spray. (I highly recommend getting an oil mister- that way you can use your own oil, without all the other ingredients that the cooking spray usually contains.)
5. Place the chicken in the oven and make for 10-12 minutes, until the chicken is cooked through, and the coating is golden brown.
6. While the chicken cooks, place the butter and the wing sauce in a microwave safe bowl and microwave in 30-second increments until the butter is melted. Whisk together to combine.
7. When chicken is cooked, dredge each piece carefully in the buffalo sauce to coat.

Avocado Ranch Dressing

Ingredients:
1/2 avocado, removed from skin and diced
1/3 cup mayonnaise
1/3 cup sour cream
2 tsp olive oil
1 1/2 tsp lemon juice
Up to 1/2 cup buttermilk
1 small bunch of chives, or 1 scallion, roughly chopped
2 Tbsp parsley, chopped
1 small clove garlic, minced
1/4 tsp sea salt
Freshly ground black pepper

Directions:
1. Place avocado, mayonnaise, sour cream, olive oil, lemon juice, 1/4 cup buttermilk, chives (or scallions), parsley, garlic, salt and pepper to taste, in a blender. Blend for about 10 seconds. Scrape down side, add more buttermilk if desired to change consistency, and blend until completely smooth. Season with salt and pepper to taste.

Source: Smells Like Home

Buffalo Chicken Previously: Buffalo Chicken Melts

Here are some other buffalo chicken recipes from around the web that I’d love to try!
Buffalo Chicken Monkey Bread (Confections of a Foodie Bride)
Buffalo Chicken Bites (Tracey’s Culinary Adventures)
Buffalo Chicken Egg Rolls (Smells Like Home)
Buffalo Chicken Sliders (Country Cleaver)
30-Minute Buffalo Chicken French Breads (How Sweet It Is)

Cod en Papillote with Zucchini, Tomatoes, and Basil

Another night, another solo dinner, and this time, rather than going vegetarian, I decided to buy some seafood for myself!  I believe I’ve mentioned it in the past, but seafood, really any kind, is my favorite type of food in the world.  I don’t buy it as often as I’d like because of the expense involved, but ideally I’d like to incorporate at least two days worth of seafood in my weekly menus.  At the moment, I’m lucky if I can do one, but someday…. someday….  Since I was just cooking for myself tonight though, the expense was minimal, hooray!!

I’ve been intrigued by the whole parchment/foil packet cooking method for a while now.  I have quite a few recipes bookmarked that I’d like to try like this, and this, and this, but I just haven’t gotten around to making them.  It’s not that I’m intimidated, in fact, I didn’t doubt that this was a simple cooking method, it’s just one of those things that I kept putting off for no reason whatsoever!  I decided that tonight was the night, and because I had some yellow zucchini from the farmer’s market to use, and my cherry tomatoes and basil are exploding in my garden… and because this is another thing that my boyfriend wouldn’t eat due to his aversion to zucchini and tomatoes (craziness!!), this was absolutely perfect for just me.  In fact this was soooooo good that I want to cook this for my family when I go on vacation with them in a week- oh my goodness, I just can’t wait for vacation!!!!!
This is an easily customizable recipe which makes it just perfect no matter what ingredients you have on hand, and what your personal preferences are.  I wouldn’t omit the fish (obviously!), but you could use any kind of firm, flaky white fish, but you could customize the veggies to your choosing.  Serious Eats, which is where this recipe comes from, mentions sugar snap peas and asparagus as potential substitutions.  
Seriously guys, make this!!!!  It is so flavorful and amazingly delicious.  It is also incredibly easy and fancy looking.  It’s perfect for a solo dinner, or a dinner party!
Cod en Papillote with Zucchini, Tomatoes and Basil
Serves 1

Ingredients:
1 small to medium zucchini (green or yellow), thinly sliced
1 boneless, skinless cod fillet (about 6 ounces)
Kosher salt and freshly ground black pepper, to taste
A pinch of dried red chili flakes
1 clove garlic, minced
8 leaves fresh basil
8 cherry tomatoes
1 tbsp olive oil
1 tbsp unsalted butter, cut into about 6 small pieces
1 tbsp dry white wine
Directions:
1. Preheat oven to 450 degrees.  Tear off about a 12″ by 24″ piece of parchment or tinfoil and fold in half to make a crease.  Unfold, and place on a baking sheet.  
2. Assemble the packet by laying down your zucchini in the center of one of the sides of the parchment paper, leaving at least a one-inch border.  Place cod on the bed of zucchini, then sprinkle on salt and pepper, chili flakes and garlic.  Place the basil leaves on top, and your cherry tomatoes (they will probably want to roll off, but I found placing them stem side down helps).  Then top with your butter pieces, olive oil and white wine.
3. Fold the parchment paper in half over the fish and start crimping from one corner, and going all the way around to the other side to secure.  
4. Bake for about 12 minutes, until the fish is cooked though.  
5. Once done, you can place the parchment packet directly on your plate, and open at the dinner table.
Enjoy!!
Source: Slightly adapted from Serious Eats