Steak Salad with Bacon and Blue Cheese

Months and month ago now, I went out to dinner with some former co-workers at a restaurant/slash bar here in CT (Eli’s on Whitney for those who are local/interested). One of my friends got a seriously amazing looking steak salad, which totally gave me entree envy. My dinner was good, but hers looked so delicious that I just could not get it out of my head. This salad was composed of greens, candied walnuts, craisins, gorgonzola cheese, Granny Smith apples, and was dressed with a balsamic vinaigrette, and she had it topped with a perfectly cooked steak. I still have yet to have this specific salad, but I knew then and there that I would be putting steak salad on my dinner planning menu in the near future. Now, I knew Ron would not be thrilled about the craisins or apples in the salad (he’s not generally a fan of fruit, and especially not a fruit+meat person), but I knew he’d love the idea of steak in any form, so when I saw this salad in Rachel Ray’s magazine I immediately put it on our menu. She uses spinach and watercress in her version of this salad, but I decided to go with a more general baby greens mix, and I also changed out the Petit Filets for a more budget-friendly cut of beef. This salad turned out so well, that we immediately put in on the menu for the following week, and now looking at the pictures I wish I had the ingredients to make it again tonight.

Steak Salad with Bacon and Blue Cheese

Steak Salad with Bacon Bits and Blue Cheese
Serves 4

Ingredients:
6 slices bacon
2 lbs steak (Petit Filets are suggested, but use your favorite tender cut- I used sirloin tip steak and cut it very thinly against the grain)
1 Tbsp Worchestershire sauce
Kosher salt and freshly ground black pepper
3 Tbsp extra-virgin olive oil, plus more for drizzling
1/2 lemon, juiced
1 clove garlic, pressed
2 tsp Dijon mustard
1 Tbsp white wine vinegar (you could use Sherry, champagne or red wine vinegar as well)
8 cups salad greens (I like using a mix that contains baby spinach)
1/2 red onion, thinly sliced
1 cup blue cheese crumbles

Directions:
1. Preheat oven to 375 degrees. Heat a grill, or heavy (preferably cast-iron) skillet over medium-high heat.

2. Line a baking pan with aluminum foil (for easy clean up), place bacon on sheet, and cook for 15-18 minutes. When cooked, remove to a paper towel-lined plate to get rid of excess fat. Crumble when slightly cooled.

3. Season steak with Worcestershire sauce, salt and pepper, and drizzle with olive oil. Cook on grill or skillet until cooked through to your liking. The timing will depend on the type of steak used, but for a petit filet, about 4-5 minutes per side will cook it to about medium-rare. Let rest for 5-10 minutes once cooked, and then slice against the grain very thinly.

4. In a small bowl, or salad dressing mixer (pretty sure that’s not the real name of that haha), whisk together the lemon juice, garlic clove, mustard and vinegar. Slowly stream and whisk in the olive oil if doing this in a bowl, otherwise just add the olive oil and shake to combine, or use the salad dressing plunger.

5. Place about 2 cups of greens on each plate, split sliced steak, crumbled bacon, blue cheese, and sliced red onion evenly among the plates, and top with dressing.

Source: EveryDay with Rachel Ray, May 2014

Bacon-Wrapped Potato Bites with Chipotle-Sour Cream Dipping Sauce

My boyfriend and I have an annual Halloween tradition in which we eat lots of junk and watch horror movies all night on Halloween. It’s one of the days I allow myself to indulge (okay-one of many). This year we decided to watch Cabin in the Woods (my favorite movie from last year), The Ruins, and The Exorcist (because you need a great classic horror film in the mix!). Other movies that have made appearances in the past: Halloween (of course), Trick ‘R Treat and Hocus Pocus (maybe one of the greatest movies known to man!). Our menu always includes our favorite nachos along with some other goodies. This year we went with pizza, mozzarella sticks, and these fabulous bacon-wrapped potato bites. They were super tasty and very easy to make- the hardest part was assembling them- which really wasn’t hard at all, just took a little time, but they are definitely worth it!

Bacon-Wrapped Potato Bites with Chipotle Dipping Sauce

Bacon-Wrapped Potato Bites with Chipotle-Sour Cream Dipping Sauce

Makes about 36 potato bites

Ingredients:

1 lb small red potatoes, cut into 1/2-inch pieces

2 1/2 tsp salt, divided

Freshly ground black pepper

1 1/2 tsp fresh rosemary, minced

1 Tbsp olive oil

1 lb thick-cut bacon, cut into thirds

1/2 cup sour cream

1-2 tsp adobo sauce (more if desired)

Directions:

1. Preheat oven to 400 degrees. Line a baking sheet with tinfoil, and place a wire rack on top (this will help the bites cook evenly and the bacon crisp without the need to flip during cooking).

2. Place potatoes in a medium pot, cover with cold water, add 2 tsp salt and place over high heat. Bring to a boil, and once boiling cook for 3-4 minutes until potatoes can be pierced easily with a fork, but not totally cooked- you don’t want them super soft or falling apart- they will finish cooking in the oven.

3. Meanwhile, as the potatoes are cooking, mix together the olive oil, remaining 1/2 tsp of salt, a pinch of pepper, and rosemary in a medium bowl. When the potatoes are cooked, drain and add them to the bowl and toss.

4. Wrap the bites in the bacon strips (cut into thirds), and secure with a toothpick. Place on rack on baking sheet. If you need to you can use 2 baking sheets, as you don’t want to crowd the bites. Cook for 30-40 minutes until bacon in cooked though and crispy.

5. While the bites are cooking, stir together the sour cream and adobo sauce, adding more or less to achieve your desired spice level. Season with salt and pepper to taste. You can double the sauce if you’d like, but I found this to be more than enough.

6. Serve the bites with the dipping sauce!

Source: The Kitchn via Tracey’s Culinary Adventures


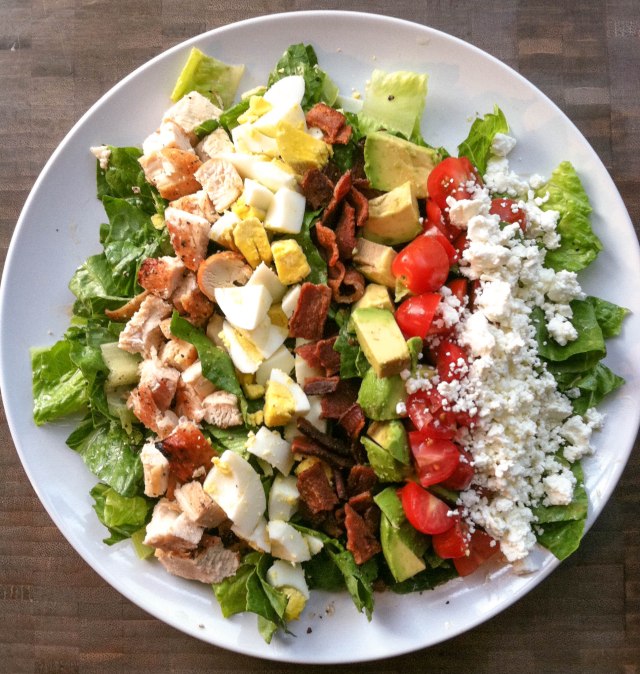
Buffalo Chicken Cobb Salad with Buffalo Deviled Eggs

We’ve made it halfway through the week guys!! Aren’t you excited?! I know I am… but I’ll be even happier when tomorrow is over. The hardest days of my week are always Tuesday and Thursday, and I always feel such a sense of relief when Thursday is done with. If only there was a way to fast-forward through the work day… but alas, that has not been invented yet. I discovered something this week though that is making the work week infinitely better, and that is the amazing fact that you can watch “Are You Afraid of the Dark?” on Amazon instant watch… for free if you are an Amazon Prime member. Oh yes, this was one of my favorite childhood shows, and it is still extremely entertaining. We didn’t have cable until I was in middle school, so when we would visit my Grandparents, one of the things I looked forward to was watching Nickelodeon, and the show I most looked forward to (and always wished would be on) was “Are You Afraid of the Dark?” That and “Clarissa Explains It All” were my two top shows I loved as a kid… and incidentally, “Clarissa Explains It All” is available to watch as well. My life might just be complete now!!! Oh, and they have “Hey Dude”…. now if only they would add “The Secret World of Alex Mack”.

Buffalo Chicken Cobb Salad with Buffalo Deviled Eggs

So now that you’ve waxed nostalgic over old Nickelodeon shows with me, it’s time for the recipe! When I saw this buffalo chicken Cobb salad over on Iowa Girl Eats it screamed for me to make it because as you know,  I love all things buffalo. This is a great way to add excitement to a salad, and an awesome variation on the classic Cobb salad. I love the addition of the buffalo deviled eggs, and they would be great on their own as well for an appetizer! This is also a boyfriend-approved salad, so like the classic Cobb salad, make this if you are trying to get more vegetables into your significant other!

Buffalo Chicken Cobb Salad

Serves 4

Ingredients:

2 (6-oz) boneless, skinless chicken breasts, trimmed

1/4 buffalo wing sauce (I used Frank’s)

Salt and pepper

4 slices bacon, cooked until crisp, and crumbled

1 large head romaine lettuce, shredded

1 cup grape tomatoes, halved

1 ripe avocado, pitted, peeled and cut into 1/2-inch dice

1/2 cup feta cheese, crumbled

Ranch dressing (optional)

For buffalo deviled eggs:

4 large eggs

1 1/2 Tbsp ranch or blue cheese dressing

1 Tbsp buffalo sauce

Directions:

1. To make buffalo deviled eggs: Place eggs in medium saucepan, and cover with water by 1-inch. Bring to a boil over high heat. When vigorously boiling, turn off heat, and let eggs sit for 15-18 minutes*. Drain, run under cold water until you can handle them. Peel the eggs, and remove the yolk to a small bowl. Add the ranch or blue cheese dressing and the buffalo sauce to the yolks, and mash together until smooth. Cut the egg whites in half again, so that you have quarters, and stuff with the egg yolk mixture. I like to put my egg yolks in a ziplock bag, snip a small hole at the end, and pipe the filling into the eggs. *If you have your own foolproof method for making hard-boiled eggs, please feel free to use that instead of this method 🙂

2. To make the chicken: Preheat broiler, place oven rack 6-inches from top. Line a baking sheet with aluminum foil, and spray with cooking spray. Season chicken with salt and pepper, and place on baking sheet. Broil for 4-8 minutes until lightly browned. Flip chicken over, and broil for 6-8 minutes more, until chicken is fully cooked. Let cool until they can be handled. Chop into 1/2-inch cubes place in medium bowl. Mix with buffalo sauce.

3. To assemble salad: To assemble salads, place a serving of lettuce on each plate, and then arrange the buffalo chicken, deviled eggs, bacon, cheese, avocado, and tomato on top of the lettuce in rows. Drizzle ranch dressing on top if desired.

Source: barely adapted from Iowa Girl Eats and my Chicken Cobb Salad

Chicken Cobb Salad

Do you ever feel like you need to get some vegetables into your body, stat?! I do! Especially after many indulgences in a row, my body just craves veggies! This is a great way to incorporate vegetables into a meal in a guy-friendly way. I think a hearty salad that has the good stuff, but also some chicken, bacon and cheese is the perfect way to get my boyfriend to eat his vegetables, and be happy about it!  This classic salad was so tasty, and also very beautiful looking! Of course, when you eat it it becomes jumbled like any normal salad, but at least for a couple of minutes it looks so orderly and elegant! … and now I’m really inspired to try some other variations on the Cobb salad like this one, this one and this one.

Chicken Cobb Salad

Chicken Cobb Salad

Serves 4

3 Tbsp red wine vinegar

2 Tbsp olive oil

1 tsp Dijon mustard

2 (6-ounce) boneless, skinless chicken breasts, trimmed

4 slices bacon, cooked until crisp, and crumbled

2 hard-boiled eggs

1 large head romaine lettuce, shredded

1/2 ripe avocado, pitted, peeled and cut into 1/2-inch dice

2 plum tomatoes, cut into 1/2-inch dice

3 ounces feta cheese, crumbled

Coarse salt and freshly ground black pepper

Directions:

1. Preheat broiler, place oven rack 6-inches from top. Line a baking sheet with aluminum foil, and spray with cooking spray. Season chicken with salt and pepper, and place on baking sheet. Broil for 4-8 minutes until lightly browned. Flip chicken over, and broil for 6-8 minutes more, until chicken is fully cooked. Let cool until they can be handled. Chop into 1/2-inch cubes and set aside.

2. In a small bowl, whisk together the vinegar, olive oil, dijon mustard, and salt and pepper to taste. Toss the lettuce with the dressing.

3. To assemble salads, place a serving of lettuce on each plate, and then arrange the chicken, eggs, bacon, cheese, avocado, and tomato on top of the lettuce in rows.

Source: adapted from The Cook’s Illustrated Cookbook and Everyday Food: Great Food Fast


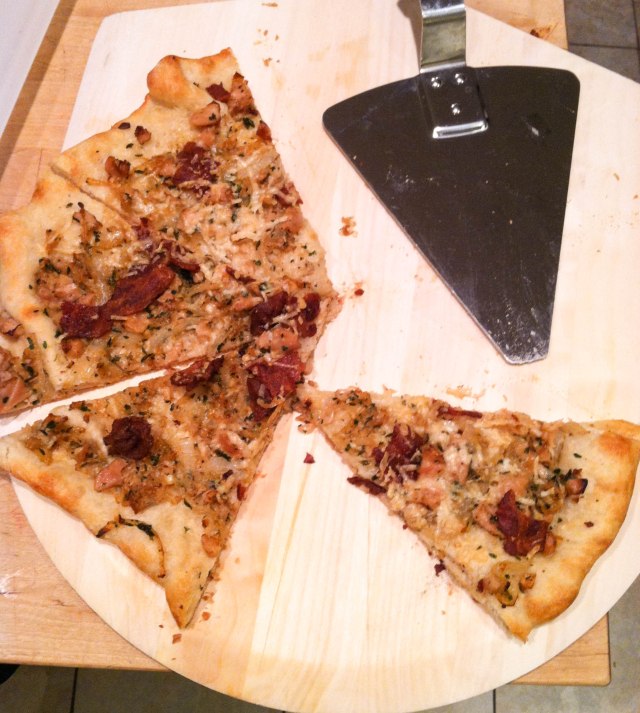
Clam, Bacon and Onion Pizza

Clam, Bacon and Onion Pizza

So as I’ve mentioned, growing up in New Haven, Connecticut means that I’ve had my fair share of awesome pizzas. One of the most famous ones (which I’m ashamed to say I’ve never had)- is the white clam pizza at Pepe’s. I have had a couple of clam pizzas at other restaurants though, and it’s one of my favorite pizza toppings. I never thought about making it at home though, until I saw a recipe for it on America’s Test Kitchen Feed. In all honesty, it was Ron who chose this recipe on the particular week I made this. You see, like my Mexican-themed Pinterest board, I also have a pizza-themed one, and I had Ron take a look one day while I was meal planning, so that he could choose one he wanted me to make…. and he chose this one. I have to say that this is one of my favorite pizzas I’ve made in my own home. The combination of salty bacon, chewy clams, and sweet onions was amazing, and it’s a pizza that I’ll be making time and time again.

Clam, Bacon and Onion Pizza

Clam, Bacon and Onion Pizza

Makes 1 pizza

Ingredients:

4 slices bacon, cut into 1 1/2-inch pieces

1 large onion, halved and sliced thin

2-3 garlic cloves, minced

1-2 Tbsp fresh thyme, minced

2 Tbsp dry white wine

3 (6.5 oz) cans minced clams, drained

Salt and pepper

Olive oil, for brushing on pizza dough

Parmesan cheese, shredded (optional)

Pizza dough

Directions:

1. Place a pizza stone on the bottom rack of the oven, and preheat oven to 500 degrees. Let preheat for an hour before baking pizza.

2. In a large skillet, over medium heat, cook bacon until crisp. Remove bacon from pan and place on a plate lined with paper towels, and drain all but 2 tbsp of bacon fat from the skillet.

3. Add the onion to the skillet, and cook for about 4-6 minutes, until it is beginning to brown. Then add the garlic and thyme and cook about 30 seconds more., until fragrant. Add the wine and clams and cook for 1-2 minutes until the wine has mostly evaporated. Season with salt and pepper to taste.

4. Stretch or roll out your pizza dough on a peel sprinkled with flour or cornmeal. Brush a a light coating of olive oil over the dough and then spread clam, bacon and onion mixture evenly on top. Slide onto the pizza stone, and bake for 14 minutes. Sprinkle Parmesan cheese on the pizza when you remove from the oven, if desired.

Source: America’s Test Kitchen Feed

Potato Frittata with Feta and Scallions

Whelp, remember when I said that I was hoping for a snowy winter?  Looks like I got my wish, plus some!  As I’m sure everybody know, Connecticut got a gigantic storm over the weekend, starting Friday morning, and ending Saturday morning.  We got about 3 feet of snow! That’s the most I’ve ever seen in one shot. I couldn’t even see my car when the storm was done, and we were stranded in our apartment for a few days. Luckily we never lost power, and so we were able to stay inside all warm and cozy, with an excuse to be totally lazy. We did get outside and shovel, which was extremely exhausting, and my arms feel dead now because of it, but other than that, this was the perfect time to just relax. As I am a hoarder of food, we had no problem keeping ourselves well-fed. We even decided to risk salmonella poisoning, and made a batch of cookie dough and no cookies. Here’s to snow!

So this is something I cooked last week before the blizzard hit. It’s the second recipe I’ve made from Deb Perelman’s wonderful cookbook, The Smitten Kitchen Cookbook. (The other was her flat-roasted chicken with tiny potatoes- something I will be making again and I will make sure I share it with you were when I do.) Her blog is one of the best out there, and I urge you to check it out! Ron got me her cookbook for Christmas, and over vacation I read the entire thing, front to back. I am now slowly working my way through the archives of her blog. I love her writing, and reading both the cookbook and her blog make me feel like I’m sitting right there with her in her tiny kitchen listening to a good friend tell me a story.

I made this frittata for dinner and Ron and I devoured it! I busted out my cast-iron skillet to cook this, and as I did, I resolved to not fear this skillet. I don’t know why, but cooking with cast-iron really intimidates me. I decided that I have to get over this once and for all, especially since this frittata turned out so beautifully in it. This frittata reminds me of another dish I love, Ina Garten’s Omelet for Two, from her cookbook Barefoot Contessa at Home. I love that recipe and that cookbook. I don’t think I’ve ever made an Ina Garten recipe that I’ve disliked! While that omelet (which really is more of a fritatta also), uses cheddar cheese and diced potatoes, this one uses feta cheese and sliced potatoes. Other than that they are very similar and are both awesome! I’ll post that recipe soon.

Potato Frittata with Feta and Scallions
Serves 4 (as a dinner) or 6-8 as a breakfast

Ingredients:
3 Tbsp olive or vegetable oil
1 3/4 lbs Yukon Gold potatoes, peeled, cut into 1/4-1/2-inch slices, and then into half-circles
1/2 tsp table salt, plus more for roasting potatoes
Freshly ground black pepper
1/4 pound bacon, thick-cut, cut crosswise into 1/4-inch pieces
1/2 bunch (3-4) scallions, trimmed and thinly sliced
2/3 cup (3 oz) crumbled feta cheese
6 large eggs
2 Tbsp milk or cream

Directions:
1. Preheat oven to 400 degrees. Oil a baking sheet or roasting pan with 1-2 Tbsp of oil. Place the potatoes, on the pan, and season with salt and pepper. (They do not all have to be in one layer). Roast about 30 minutes until the potatoes are mostly cooked through, tossing halfway. Remove from oven, and let cool down a bit.
2. Place a cast-iron or other 9-inch oven-proof skillet over medium heat, and cook bacon until crisp. Remove bacon with a slotted spoon, and drain on paper towels. Add the remainder of the oil to the skillet with the bacon drippings (1 Tbsp), and reheat on medium. Make sure you swirl the oil and drippings around in the skillet to coat the sides of the pan.
3. Place the potatoes in the skillet, browned side up. Then sprinkle on the bacon, scallions and feta.
4. Whisk together your eggs and milk, adding 1/2 tsp salt and freshly ground black pepper. Pour over the potatoes.
5. Cover your skillet with aluminum foil, and bake for 20 minutes. Then remove the foil, and bake for another 10-15 minutes, until the eggs are set in the center, and the edges have puffed up.

Source: The Smitten Kitchen Cookbook by Deb Perelman

New England Clam Chowder

One of my main goals during my vacation was to eat as much seafood as possible.  I love it, but I don’t buy it very often due to it’s price.  Even though I live in Connecticut, where you’d assume seafood would be abundant, it’s still often outside my limited price range.  I could certainly buy it more often, but then I’d be making ramen noodle soup more often as well.  In Chincoteague, as it’s right on the water, there is much more locally caught seafood to buy and eat, and the prices were generally much better!  I absolutely achieved my goal, and one of the ways I did that was to make the chowder twice, buying mounds of clams from Gary Howard seafood.  This is a very clammy clam chowder so if you like clams, you’ll like this!  It’s a thin, not creamy chowder, so if you are looking for something with a creamy consistency, this is not the recipe I’d personally choose for that (although I would like to try pureeing some of the potatoes in this chowder to see what it does for the thickness), but it’s super-delicious.  It’s great in larger servings for a main course, or as a first course to a meal, especially one loaded with more seafood.

New England Clam Chowder
Serves 4

Ingredients:
36 hard-shelled clams (less than 2 inches wide), such as littlenecks, scrubbed well
1 1/2 cups cold water
2 medium boiling potatoes
2 tbsp unsalted butter
2 bacon slices, chopped
1 small onion, chopped
1 cup half-and-half
Freshly ground black pepper
2 tbsp fresh flat-leaf parsley, chopped
Directions:
1. Put the clams, and the cold water in a large pot, and place over medium-high heat.  Bring to a boil.  When it starts to boil, cover with the lid, and steam for 5 to 8 minutes until the clams open.  Check after 5 minutes, and begin removing any that have opening.  If any are still closed, allow them to steam longer.  Discard any that haven’t opened after 8 minutes.  Strain and reserve the cooking liquid (there will be some fine grit, so use a fine-mesh sieve, or line a sieve with cheesecloth to strain out the grit).
2. When the clams can be handled, remove them from their shells, and roughly chop.
3. Peel the potatoes, and dice them into 1/4-inch pieces.
4. Place a large saucepan over medium heat, and add the butter. 
5. When the butter is melted, add the bacon, and cook until golden, about 4 to 5 minutes.
6. Add the onion, and cook until softened, about 5 minutes, stirring often.
7. Add the potatoes, and reserved cooking liquid, and simmer, covered, until the potatoes are tender, 5-10 minutes.
8. Add the clams, half-and-half, and pepper to taste, and cook about 1 minute until heated through.  Do not let the chowder boil.  
9. Add the parsley.
Notes:
  • As I mentioned earlier, I’d love to puree some of the potatoes once they’re cooked as it should give the finished soup a thicker consistency. 
  • If you’d like, you can use salt pork instead of bacon, but the bacon lends a nice smokiness to the chowder.
  • It is very easy at the end for the half-and-half to separate a bit.  Mine did in fact, but it will not affect the taste or consistency if this happens a little bit, it’s more a visual thing.

Grilled Pizza

Hey guys, long time no see!!!   I’m so sorry for the lack of posting recently.  It’s not that I haven’t been cooking, I definitely have, but I guess I’ve been lacking the drive to sit at the computer.  I’m going to blame the heat the last few weeks… easy excuse, right?  Anyway, I thought that tonight I’d post one of the delicious recipes I’ve made lately from my new favorite cookbook- Gourmet Today.  I’ve found so many great recipes so far, and I’m dying to make many many more.  There are seriously hundreds of recipes that jumped out at me when I read through the cookbook.  I am going on vacation tomorrow, down to Virginia, but when I get back I am hoping that my relaxing vacation reinspires me to jump back into blogging.

As you know from the title, this is a recipe for grilled pizza.  Before I made these, I’d never made any kind of pizza, but after seeing how awesome these came out I’ve been dreaming up many more pizza combos I’d love to try out.  I used the basic dough recipe from Gourmet Today, but obviously cooked it on the grill instead of the oven, and while I’d describe it more as “flatbready” I suppose, it was super-awesome.  I made 4 mini-pizza with 2 types of toppings- the first, a caramelized onion and mushroom pizza was amazing, and the second, a BLT pizza was just as good, but more of a summery pizza.  The caramelized onion and mushroom I’d consider a year-round pizza.  Both were incredible.

Basic Pizza Dough

Ingredients:
1 (1/4-ounce) package (2 1/4 tsp) active dry yeast
About 1 3/4 cups unbleached all-purpose flour, plus more for kneading and dredging
3/4 cup warm water (105-115 degrees)
1 1/2 tsp salt
1 1/2 tsp olive oil
Directions:
1. In a measuring cup, stir together the yeast, 1 tbsp flour, and 1/4 cup warm water.  Let sit about 5 minutes, until the surface appears creamy- if this doesn’t happen, discard and try again with new yeast.)
2. In a large bowl, mix together 1 1/4 cup flour and salt.  Add the yeast mixture, olive oil, and remaining 1/2 cup warm water.  Stir until smooth.  Stir in enough of the remaining 1/2 cup flour so that the dough comes away from the side of the bowl.  
3. Knead the dough on a lightly floured surface, with lightly floured hands, for about 8 minutes, until the dough is smooth, soft and elastic.  If the surface, or your hands become sticky, add more flour.  Form the kneaded dough into a ball, place in a lightly floured large bowl, dust the dough with flour, and cover loosely with plastic wrap.  Leave to rise in a warm, draft free place for 1 1/4 hours, until the dough doubles its size.
4. Once the dough is risen, carefully dredge in flour to coat, and transfer to a lightly floured work surface.  **Do not punch the dough down**  
5. At this point, you can either make one large 14-inch pizza, or smaller individual ones- I made 4 mini-pizzas.  Either way, carefully hold the dough with the bottom surface touching your work surface, and move the dough around with both hands as if holding a steering wheel, letting the weight of the dough stretch into a round.  Once to your desired size, place the round on a lightly floured surface, and work the edges with your fingers to get it to the desired size.
6.  Once formed, your dough is ready to top, bake or grill, depending on which recipe you are using for toppings.
** To grill, heat grill to medium-high heat.  Oil the grates well!  Brush the pizzas with olive oil on each side.  Place on grill over indirect heat (not over the coals- they’ll burn fast!).   Cook about 3 minutes, covered, until the dough begins to have large bubbles on the surface, and the underside is cooked.  If you are going to be putting on a topping that will warm up/melt cheese, remove the dough round to a clean surface with the cooked side facing up, and place your cheese/toppings on.  Return to grill and cook, covered for 4-6 minutes, until the dough is cooked, and the toppings/cheese are ready.  If you are putting a topping on that does not need to be cooked (like the BLT pizza), just flip the dough round over, and cook, covered for about 4 minutes.**  (Grilled pizza instructions adapted from Annie’s Eats)
Notes:
  • You can leave the dough to rise up to a day, covered and refridgerated.  Bring it to room temperature before you shape it.
  • After rising, the dough can be frozen up to 1 month.  Thaw and bring to room temperature before shaping.
  • My pizzas were definitely not round, but they were still tasty- this is a recipe where only practice will make perfect!
  • Watch your dough closely, as it can burn quickly.  My pizzas had a little char to them, but the smokiness just added some more delicious flavor.  Too much though, and it would probably overwhelm.

Mushroom and Caramelized Onion Pizza
Makes one 14-inch pizza, or 4 individual pizzas

Ingredients:
5 Tbsp extra-virgin olive oil
1 pound yellow onions, halved lengthwise and thinly sliced lengthwise
Salt and freshly ground black pepper
1 pound white mushrooms, or mixed wild mushrooms (such as shitake, cremini and oyster), trimmed if   necessary and sliced
1 tsp red wine vinegar
2 3/4 cups coarsely grated Swiss Emmental cheese, or Gruyere (about 8 ounces)
1/2 cup finely grated Parmigiano-Reggiano
1 tbsp fresh thyme leaves
Basic Pizza Dough (recipe above)
Directions:
1. In a 12-inch heavy skillet heat 3 tbsp olive oil over medium heat until hot but not smoking.  Add the onions, 1/4 tsp salt, and 1/8 tsp pepper.  Cover directly with a round of parchment paper.  Cook until the onions are softened and golden brown, stirring occasionally, about 18-20 minutes.  Transfer the onions to a bowl.
2. To the same skillet, add the remaining 2 tbsp olive oil, and heat until hot but not smoking.  Add the mushrooms, 1/2 tsp salt, 1/4 tsp pepper, and red wine vinegar, and cook about 8-10 minutes, stirring occasionally, until the mushrooms are browned and any liquid is evaporated.  Remove the mushrooms from the heat. 
3. Cook one side of your pizza dough on a grill preheated over medium high heat (as detailed above).  When done, remove to a clean surface.  Top the cooked side of the dough with the Emmental or gruyere cheese.  Scatter onions and mushrooms on top, and sprinkle with Parmesan.  
4. Place back on the grill over indirect heat, and cook, covered, 4-6 minutes, until the dough is cooked, and the cheese is melted.  Sprinkle with fresh thyme.
Notes:
  • The original recipe calls for Swiss Emmental cheese, but I had some gruyere left over so I used that instead, and it turned out wonderful.  Any type of Swiss cheese would probably do just fine, depending on how strong or mild you like it. 
  • I omitted the thyme because I thought I had some, but when I went to make the pizzas realized I didn’t, but I didn’t miss it at all.  I’m sure it would’ve been good, but I don’t think it’s necessary.
  • I halved this recipe to make 2 individual pizzas.

BLT Pizza
from Annie’s Eats, dressing from Annie’s Eats and Alton Brown via foodnetwork.com
Makes 4 individual pizzas

Ingredients:
Basic pizza dough (recipe above)

For salad topping:
4 cups green leaf lettuce, or mixed greens
1 tomato, seeded and diced
1/2 small red onion, thinly sliced
4 slices bacon, cooked and crumbled (drippings from cooking reserved for dressing)
1/2 cup crumbled feta cheese
For bacon vinaigrette:
1 1/2 tbsp extra virgin olive oil
2 tbsp cider vinegar
1 tbsp bacon drippings
1 1/2 tsp brown sugar (preferably dark)
1 1/2 tsp dijon mustard
1/4 tsp salt
1/2 tsp freshly ground pepper
Directions:
1. Combine the ingredients for the bacon vinaigrette in a small bowl, or salad dressing bottle, and whisk (or use handy emulsification device) to combine.
2. Combine the lettuce, tomato and onion in a large bowl, and toss to combine.  Add 1/4 cup of dressing to the salad, and toss gently to coat.  Add the bacon and feta to the salad, and toss gently to combine.
3. Make your grilled pizzas (recipe above), cooking both sides.  Top your cooked pizza dough with some of the salad mixture, and serve!
Notes:
  • This salad is great on it’s own, so if you don’t want to make pizza, or if there is leftover, eat it plain!
  • You can also use the vinaigrette to dress any salad…. In Alton Brown’s original recipe he uses basically double the amount, and tops 2 quartered heads of radicchio.  For quantities for his recipe go here!
  • This is one of the most refreshing summery pizzas I’ve ever had, and although topping a pizza with salad may seem a bit unusual, I can’t wait to make some other summery salad pizzas.

    BLTs with Roasted Red Pepper Mayonnaise

    There are many cooking-related things that I have never done before- for example, I’ve never baked bread, made hollandaise sauce, made a crepe, or made homemade mayonnaise.  All of these things intimidate me for one reason or another, and so many of these things made it onto my resolutions list for the new year.

    After perusing Joy the Baker one day (if you haven’t visited her website, do so, it’s awesome!), I came upon a post on the best BLTs, complete with roasted red pepper mayonnaise.  BLTs are such a great thing to make in the summer when the tomatoes are fresh, and you don’t want to use your oven.  The only cooking involved is cooking the bacon (which you can cook in the oven, but I do on the stovetop for the most part).  I figured her roasted red pepper mayonnaise was just the thing to kick these already delicious sandwiches up a notch, and give me the drive to make my own mayonnaise.  I was so surprised at how easy it was- if you have a food processor that is (someday I’ll try making it by hand).  That’s one resolution I can now check off my list!

    Roasted Red Pepper Mayonnaise
    from Joy the Baker, originally adapted from Fat

    Makes about 1 cup
    Ingredients:
    1 large egg yolk
    3/4 tsp Dijon mustard
    1 tsp lemon juice
    salt and pepper to taste
    1 roasted red pepper, coarsely chopped (jarred, or homemade)
    3/4 cup canola or grapeseed oil
    Directions:
    1. Combine the egg yolk, mustard, lemon juice, and roasted red pepper in a food processor.  Mix about 30 seconds.  Add a pinch of salt and pepper and blend again for a couple seconds.
    2. With the food processor running, slowly add the oil.  It’ll start to emulsify fairly quickly, and it will take about 1-2 minutes to thicken to mayonnaise consistency.  Taste and season with salt and pepper to taste.
    Notes:
    • The leftover mayonnaise can be stored in an airtight container in the refrigerator and will last for 3-4 days.
    • The recipe makes a good amount, so you’ll probably will have a good amount leftover, depending on how many BLTs you are making. You could use the mayo on any type of sandwich or burger, as a dipping sauce for potato wedges, in egg or potato or chicken salad, as a dipping sauce for artichoke leaves….. whatever you want!!
    BLTs

    Ingredients:
    Good bread, toasted
    Bacon, cooked
    Tomato, sliced thinly or thickly
    Lettuce (romaine, iceberg, butter, Boston….)  I used some lettuce from my garden!
    Cheese (optional)
    Roasted Red Pepper Mayonnaise
    Directions:
    1.  Ummm… so you don’t really need instructions to make this sandwich!  Just take your toasted bread, slather it with mayo, and top it with bacon, lettuce and tomato (and cheese if you want).  Eat and enjoy!

    Bacon and Cheddar Quiche

    Once upon a time I wasn’t a fan of quiche… I also wasn’t a fan of scrambled eggs, or other assorted egg dishes, and then something changed!  It was a miracle that began with the addition of cheese and chives to scrambled eggs, and then branched out.  I still am grossed out by sunny side up eggs (something my boyfriend feels the need to terrorize me with now and again), but other than that I have to say I’m an egg fan.  Despite that, quiche is something I’ve never actually made- and neither is pie dough- so making a quiche from scratch encompassed two firsts for me.  I know there are about 7863 recipes for pie dough and quiche out there, but I decided to be all fancy-like and start with the recipe from Mastering the Art of French Cooking, because quiche is a classic French dish and all.  I have to admit that I was a bit nervous about making this- especially the dough, because it’s one of those things that you have to work quickly to make or else!!

    So I read the instructions a bazillion times before attempting to make the dough… and I still think I worked too slowly.  Not that the dough wasn’t good- it really was good- but I feel like it could have been better.  It also puffed up way more that I think it was supposed to which could have been a variety of things- did I work to slowly?  Did the dough get too warm while  I was making it?  Did I not roll it out thin enough?  Was it because I didn’t put a mold, or dry beans, or anything in the crust while I pre-baked it?  I’m not sure- maybe it was a combination.  But despite that it turned out pretty well, although I took it out a little too early at first and had to put it back in for a few minutes because after I cut it I realized it was a little underdone…  Also, Julia Child’s version is pretty custardy, I think that’s the way it’s supposed to be, but I personally like it a little bit denser I guess (I think that’s the right word for my preferred quiche texture).  For my quiche I ended up substituting cheddar cheese for Swiss, and adding bacon, so I basically combined the recipe for Quiche Lorraine and Quiche au Fromage.. but hey, I like cheese and bacon together… they are a perfect match.

    With the quiche, I served a simple mesclun salad with freshly picked greens from my garden- my first crop!!!  I didn’t put anything in the salad this time- just the greens and a simple vinaigrette because I wanted to get the full flavor of the greens, but maybe I’ll do something fancier next time- with cheese, and toasted walnuts or something.

    Mesclun Salad with Red Wine Vinaigrette


    Ingredients:
    For the salad:
    Mesclun greens

    For the vinaigrette: (makes about 1/2 cup)
    2 tbsp red wine vinegar
    1/8 tsp salt
    1/4 tsp dry mustard
    6 tbsp olive oil
    Big pinch pepper
    1-2 tbsp minced fresh parsley

    1.  Wash and dry greens thoroughly.
    2.  In a bowl, whisk together vinegar, salt and mustard.  Then slowly add oil, and season with pepper.  If you have a salad dressing shaker, or emulsifier, combine vinegar, salt, mustard and oil, and shake vigorously, or use emulsifier to combine.  Stir in parsley, taste and season as needed.
    3. Place greens in individual bowls, and dress salad as desired.

    Source: Adapted from Mastering the Art of French Cooking


    Notes:

    • I adapted this dressing from the Sauce Vinaigrette recipe in Mastering the Art of French Cooking.  This is just a simple recipe for a vinaigrette made from any wine vinegar or combination of vinegar and lemon juice.  Feel free to substitute any vinegar of your choosing – white wine or champagne vinegar I’m sure would be good.
    • You can also add other types of fresh herbs- the herbs mentioned in the original recipe are parsley, chives, tarragon, and basil.  Or if you don’t have fresh herbs, you can substitute a pinch of dry herbs. Or leave the herbs out altogether.  You can also leave out the dry mustard if you want.

    Pâte Brisée


    Ingredients:
    2 cups all-purpose flour
    1 tsp salt
    1/4 tsp sugar
    6 ounces (1 1/2 sticks) chilled butter, cut into 1/2-inch bits (if no food processor), or if you have a food processor, quarter the sticks lengthwise, and cut into 3/8 inch pieces
    4 tbsp chilled shortening
    A scant half cup iced water, plus a few droplets more as needed

    Directions:
    1. If you do not have a food processor: Combine flour, salt, sugar, butter, and shortening in a large mixing bowl.  Rub the mixture together rapidly between the tips of your fingers until it resembles bits of oatmeal flakes. (Do not overmix).  Then add the water and blend quickly with one hand, fingers held together and slightly cupped, and gather dough into a ball.    If there are remnants that are not part of the dough, add a few more droplets of water, and add that to the dough.  Press the dough into a ball.  If you have a food processor:  Place the flour, salt and sugar into the food processor.  Add the butter and shortening.  Then flick the machine off and on 4-5 times.  Then while the machine is running, add the ice water.  Flick the food processor on and off a few times.  The dough should mass up on the blade.  If it does not, add a few more drops of ice water, repeating as needed.  When it has massed together, scrape dough out onto lightly floured work surface, and form into a ball. (Do not overmix.)
    2. On a lightly flours work surface, press your dough down with the heal of your hand and away from you quickly, about 6 inches.  (This is called the fraisage.)
    3. Gather the dough into a ball, wrap in waxed paper, and refrigerate for 1 hour to overnight.

    To make your partially-cooked pastry shell for the quiche:
    **Work as quickly as possible to prevent the dough from getting to warm**
    1. Preheat oven to 400 degrees.
    2. Remove the dough from the refrigerator, unwrap, and place on a lightly floured surface,
    3. If hard, hit it with your rolling pin a few times to soften it.  Knead the dough into a flat circle, and lightly flour the top of it.
    4. From the center of your dough, roll the rolling pin back and forth to begin flattening the dough.  Then, with the pin always rolling away from you start rolling out the dough into a circle.  Lift the dough and turn at a slight angle and roll again.  Continue turning, and rolling, until the dough is about 1/8 inch thick, and about 2 inches larger around the sides than your pie plate.  Lightly flour the surface, and top of the dough as needed to prevent sticking.
    5. Gently place your rolled out dough in your pie plate, and gently flatten into the bottom and sides of the pan.

     
    6. Trim off the excess dough around the edges, and on the edges press lightly with a fork all the way around to make a decorative edge.

    7. Prick the bottom of the dough with a fork, about every 1/2 inch.
    8.  If you have weights or dried beans, you can line the inside of the dough with buttered aluminum foil or buttered brown paper, and then place the weights/beans inside to weigh down the dough.  Then place in the oven and bake for 8-9 minutes.  Then remove the weights/beans, and bake for 2-3 minutes more until the shell is just beginning to color and shrink from the sides of the pan.

    Source: Mastering the Art of French Cooking, Vol. 1

    Cheddar and Bacon Quiche
    Serves 4-6


    Ingredients:
    8 inch partially cooked pastry shell (made with Pâte Brisée)
    3-4 ounces bacon (6-8 slices of medium thickness), cut into pieces 1 inch long and 1/4 inch wide
    3 eggs or 2 eggs and 2 yolks
    1 1/2 cup heavy cream, or half cream half milk
    1/2 to 1 cup cheddar cheese, grated
    1/2 tsp salt
    Pinch of pepper
    Pinch of nutmeg
    1 to 2 tbsp butter, cut into pea-sized pieces


    Directions:
    1. Preheat oven to 375 degrees.
    2. Heat a large pan over medium heat, and cook bacon until done.  Remove with a slotted spoon, and drain on paper towels.
    3. In a medium bowl, beat together eggs, cream (or cream and milk), salt, pepper and nutmeg.  Stir in the grated cheese.
    4. Sprinkle your bacon into the partially cooked pastry shell.  Then pour egg/cream/cheese mixture on top. Sprinkle your butter pieces over the top.
    5. Place in the upper third of the oven.  Bake for 25-30 minutes, until the quiche is puffed up and browned.
    6. Remove from the oven and serve.


    Source: Adapted from Mastering the Art of French Cooking


    Notes:

    • Make sure, when you are looking to see whether your quiche is done, that the top has actually browned, and it’s not just the cheese.  I think this is why mine was underdone at first- it was just the cheese that had browned a bit, and not the rest of the quiche.
    • The original recipe for Quiche Lorraine calls for Swiss cheese, and I’d definitely like to try that.  Any good melting cheese would probably be good though- I’m thinking a Gouda (because it’s my favorite).  I’d also like to experiment with some vegetable quiches- broccoli, or spinach, or asparagus would be good.
    • Quiche is definitely something I’d like to experiment with a few different recipes on- both the fillings and the pie dough.  This one was good, but it may not be my personal ideal.  Like I mentioned, I’m not so sure I was in love with the consistency.  I thought it was good, but not great for my personal tastes, but if you like custardy quiche, this may be the one for you.